The long-awaited HUMAN 81 DK is now available.
Best viewed in "landscape" mode.
How to:
Install the PRO 002 ME3 Tweeter
This is a tweeter I designed to upgrade the 'egg' shaped tweeter mounted on the top of the Epicure 3.0.
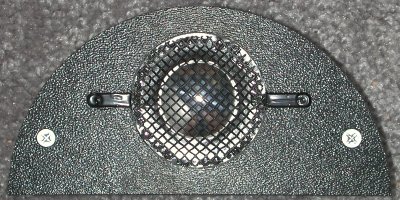
The original tweeter is very difficult to rebuild, and can easily be damaged simply by reinstalling it, since if the mounting bolts turn while tightening the nuts, it will break the wires inside it.
So, I invented this one to replace it!
If you are reading this, you are probably holding in your hands one or two new tweeters, and looking at your 3.0's wondering where to start.
First, make sure I included two new 16" wires, two mounting screws, and a small barrier strip connector for each tweeter.
Then turn off your amplifier, and disconnect the speaker wires from the connector on the bottom of your speaker.
To remove your old tweeter, start by removing the midrange screws, pulling it out and disconnecting its wires. Note which color wire went where, and place it to one side.
Remove the damping material and set it aside also.
This is probably the hardest part. Reach in through the midrange hole, and using a nutdriver or pliers, undo the two small nuts holding the tweeter mounting bolts/terminals in place.
Pull the tweeter wires down carefully, and out through the midrange hole.
Pull the tweeter itself up out of the cabinet.
Place the new tweeter about an inch in front of the bolt holes, facing forward (!), and mark where the two holes in the mounting brackets are. Put the tweeter aside again and drill small pilot holes at these locations. Now you can screw the tweeter down.
Attach the two wires to the tweeter - white to "+", black to "-". Feed the ends without terminals down through the ex-bolt holes, until only a graceful curve of wire remains above the cabinet top.
Cut the ends off the old tweeter wires and strip about 1/4" of insulation from them, being careful not to nick the wire in the middle.
Now take the two new wires and the two old wires and connect the appropriate polarity ones to each other ("+" to "+", "-" to "-") using the barrier strip included. If you prefer, use use crimp-on butt splices, or solder the connection and cover it with heat shrink tubing, or carefully wrapped electrical tape.
Tuck the tweeter wiring neatly back inside the cabinet.
Replace the damping material, carefully reconnect the midrange, and screw it back into place.
Reconnect the speaker wires. Turn the volume control all the way down and turn your amplifier back on.
Test with low level music at first, then gradually increase it to normal listening levels. Allow a day or two of breaking in for your speakers to sound their best.
* * *
Top - Contact
New Speakers -
EPI and Epicure - Genesis Physics
© Copyright - All Rights Reserved
![]()
Seven Kelsey Road, Lee, New Hampshire 03861
Prices can change and specifications will improve without notice