The long-awaited HUMAN 81 DK is now available.
Best viewed in "landscape" mode.
Great Big Project: HUMAN 1000 Kit
Back to the K1000 page
Ian not only built this pair of speakers, but he extensively chronicled the process, starting from scratch with no woodworking tools or experience. This was previously hosted at his website "Broke Hi-fi (Dumpster diving through the world's most pretentious hobby)".
What follows is his description of the project and results, with some minor editing by me. Any commentary that is not in his words is indicated [editor's note: like this].
Framework - Inner panels - Woofer holes - Bracing - Assembly
End caps - Outer panels - Odds and ends - End caps redux - Paint
Trim - Grills - A Year With the HUMAN 1000 - Epilogue
Starting - Tools - Materials
First cuts - Frames - Inner panels
Woofer holes - Bracing
Assembly - End caps - Outer panels
Odds and ends - End caps redux
Paint - Trim - Grills
A Year With the HUMAN 1000
Epilogue
Prologue
I have to admit, I'm kind of a cheerleader for Mr. Powell and his one-man New England operation HUMAN Speakers. He produces a refined version of several models of EPI and Genesis-like speakers, as well as a couple of his own design entirely. I first found out about HUMAN quite by accident; as a college kid with a junkyard Audi Coupe in need of repair, I stumbled upon his Audi Garage site and then mentally bookmarked -- this guy was pretty cool, and made his own hi-fi gear! At the time, he was just finishing up the last run of 81-10s, a more attractive design based on the formidable Genesis 2 passive radiator speaker. He had a couple of damaged cabinets that he offered for a considerable discount, I think $450 instead of $700/pair.
So, for about $475 total [editor's note: shipping was a lot cheaper back then!] I got myself a pair. They may have had vinyl dangling from their corners, but they sounded as though God himself was singing harmony to the angel choir. I had come from a generic $200 Technics pair that I thought was pretty good, with many impressive numbers, and I had been worried that a mere 8" driver wouldn't produce the bass I was used to. I simply had no idea what real hi-fi was, and I literally stumbled into it because some guy on the Internet drove the same car as me. Then, six months later when a roommate's cat clawed out one of my surrounds, Huw helped me get things put back together pretty fast. While I wouldn't hold him to that type of service for everyone, I can definitely say he's good on his warranties.
 Though I didn't have the means to get any more than just that one pair of beat-up speakers, I resolved to get more when I could: automotive, if I could manage, and larger and better if I could afford it. And I recommended them in highest praise to all my friends. At the time and even now almost ten years later, I think the Human concave dome tweeter is a remarkable and transformative work, the cleanest, sweetest and most powerful I've ever heard. So at one point last year, when it was looking like I might be able to put a couple thousand dollars together, I resolved to learn carpentry and try my hand at putting together what I always looked at in awe, the EPI 1000 tower speaker with HUMAN parts.
All told, starting from scratch with almost literally none of the right tools and no experience, this will have cost me about $2000. That's a lot of money to spend on something like speakers, to be sure; when compared against the glamorous European hi-fi speakers that cost five figures, though, I think it stacks up pretty well. Adjusted for inflation the EPI 1000 would cost at least $10,000 new, so I think an 80% discount, using modern tweeters that can go out past 26 kHz, is probably a pretty good deal. Certainly when you consider a Klipschorn with all its compromises and limitations is $4000 each!
What's more, I intended nearly from the beginning to document my efforts, first simply for personal reference and then later because I realized documentation like this could be useful to someone else. Mr. Powell says "it seems almost silly to offer plans" for this speaker; silly, perhaps, if you know anything about carpentry, but starting from zero? I really could have used some plans! These ones I've come up with aren't perfect, and aren't exactly what I did, but I'm willing to say they're the path of fewest mistakes and least expense.
Framework - Inner panels - Woofer holes - Bracing - Assembly
End caps - Outer panels - Odds and ends - End caps redux - Paint
Trim - Grills - A Year With the HUMAN 1000 - Epilogue
Starting - Tools - Materials
First cuts - Frames - Inner panels
Woofer holes - Bracing
Assembly - End caps - Outer panels
Odds and ends - End caps redux
Paint - Trim - Grills
A Year With the HUMAN 1000
Epilogue
Getting started: the basics
To begin with, these articles are written from my point of view. I'm going to assume that you have a basic level of mechanical skill and aren't afraid to pick up tools. I started this project with virtually no woodworking experience, and I'm sure my feeble efforts would be laughed at heartily by anyone actually in the trade. But I wanted cabinets, damn it, and sometimes you just have to read up and get moving. Very little on the Internet applies to building something of this magnitude; little bookshelves and such abound, but making a six-sided prism that somehow all joins up with itself and doesn't look like shit is a taller order. I was totally unable to find, for example, any way to make rip cuts 100% straight along a six foot board [Editor's note: you can either clamp a straight board to guide a circular saw or do it with a good table or radial arm saw].
You should become totally familiarized with what you're actually going to be building, before you get any further. Huw has articles here, here, here, here, and here which all relate to this project. Go forth, peruse, study, print, and ponder; this page will be here when you come back.
I've arranged this guide into logical stopping points, since you'll likely be doing that a lot unless you have unlimited free time. It's worthwhile to read it all just to see what you'll be doing, but the basic technique I've chosen is easy to explain. The boxes have an inner ladder frame that's made of softwood and screwed together. Inside the frame, a bunch of smaller half-board braces are glued in to prevent the box from resonating. Then the inner layer of MDF sheets are attached to it, rough cut and routed to fit. The woofer holes are routed out and everything gets glued and screwed together. Same with the top and bottom caps, opening a hole for the terminals and adding damping material before they're attached. The whole process is repeated for the outer layer of MDF, adding in tweeter holes and a whole lot more glue to stick the panels together. The woofer holes are rabbetted to fit the drivers flush, and the outer end caps can go on, including a larger and nicer looking hole to get to the now-recessed terminals. From then on it's just trim, painting and making grills and so forth.
 It should go without saying that safety comes first with an operation like this. You are endangering life, limb, and senses when you use high-powered tools and some caution is certainly in order. The first thing you need is the mandatory safety gear. You will need all of these things to complete this project safely; I used this gear myself, and whenever I didn't I suffered the consequences.
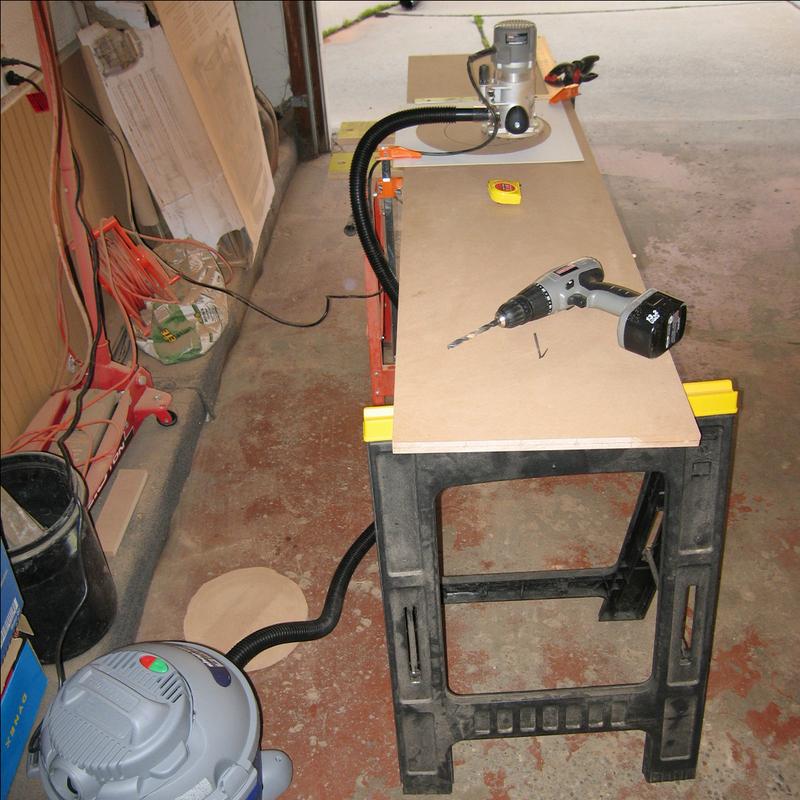
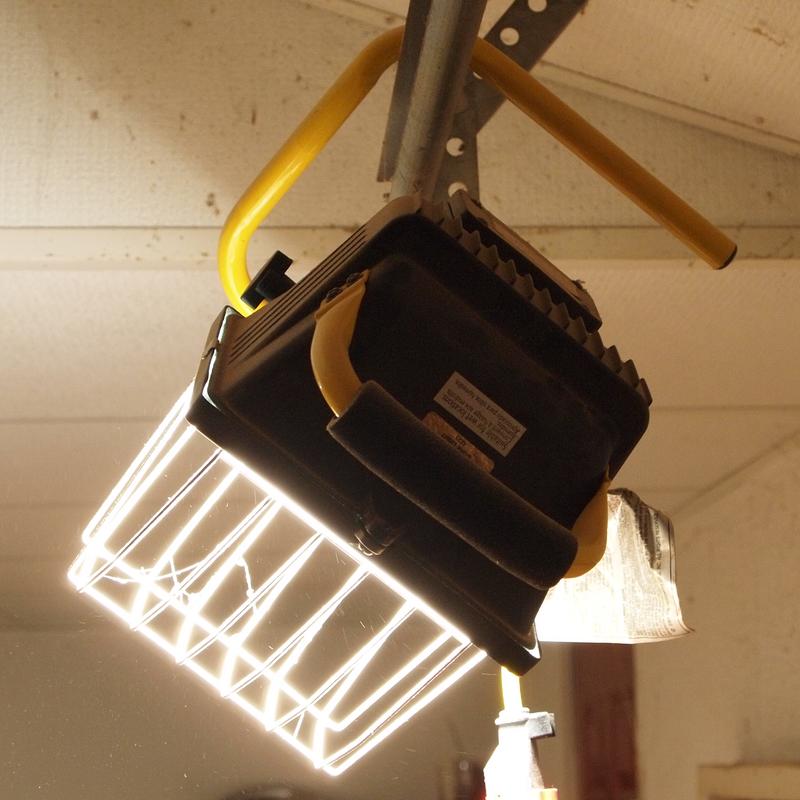 Fifth, a well-lit work area with adequate ventilation and power is a must. I had the use of a two-car garage with some fluorescent lighting that I augmented with a 500 watt halogen shop light hung from the garage door rail. If you're lucky enough to have an indoor workshop, I envy you and your climate control. I always wondered why my grandfather [Editor's note: RIP] had one until I started this project; now I wish he didn't live two time zones away. You will want several outlets and a couple extension cords available, enough to have a light (if necessary), the shop vac, and one tool plugged in at once, easily twenty to thirty amps' worth. Ventilation is important not just for you, but because the right concentration of wood dust in the air is an explosively flammable mix.
The big tools are kind of scary at first, but a cordless drill is a friendly little thing, and both the router and the circular saw are designed such that unless you're really negligent you're unlikely to seriously injure yourself. The main thing to remember with those is simply to let the motor get up to speed before you put it to work -- electric motors have peak torque and power consumption when stalled, so you're less liable to burn things up or have the tool kick back when it's actually moving (though both can still happen). The other thing is to let them spin down to a complete stop before putting them down. This way your hands are safely holding the tool the whole time it is dangeroous. Make sure you read the manuals! I learned a lot about the router and saw just by reading the books that came with them; dangerous tools have good primers on proper use.
So with all that mothering out of the way, and knowing that you're now about $30 into your project just getting yourself outfitted, let's turn the page and see what tools you're going to need.
Framework - Inner panels - Woofer holes - Bracing - Assembly
End caps - Outer panels - Odds and ends - End caps redux - Paint
Trim - Grills - A Year With the HUMAN 1000 - Epilogue
Starting - Tools - Materials
First cuts - Frames - Inner panels
Woofer holes - Bracing
Assembly - End caps - Outer panels
Odds and ends - End caps redux
Paint - Trim - Grills
A Year With the HUMAN 1000
Epilogue
Tools
The tools are where you might get lucky. Maybe you already have some of these. Maybe you have a friend from whom you can borrow some of them; maybe there will be some cheap ones on Craigslist. If you don't decide to keep them at the end of your project, you could also resell them and get a bit of your money back. I suspect I'll be keeping mine at least long enough to make a couple more cabinets with them and use up my leftover wood.
Please bear in mind that these are what I consider the bare minimum set already. If you have more tools [Editor's note: it is nice to have multiples of a few things to reduce bit/blade swapping and setup time], you might find you can do this project more efficiently than I could; if you have fewer tools, you will either be in for a world of hurt, or won't be able to complete the project. My estimated prices are what you can expect if you buy new.
[Editor's note: while Ian has been very good about listing all the tools needed here, at the beginning, in a few places my comments tell you to go out and buy more of them. This inconsistency is a good argument for reading everything from start to finish before proceeding.]
Expensive tools
You want one with variable speed, adjustable torque limiting so you don't strip everything out, and a keyless chuck. Mine is a 13.2v Craftsman that may or may not still be made; I was given it as a bizarre and unrequested Christmas gift by my parents some years ago. I'd consider it the minimum for a project like this. You will also want a spare battery, because you get about three or four screws' notice between "trucking along" and "dead halfway through". Estimated cost: $75. [Editor's note: when purchasing this tool, it can pay off handsomely to pick a brand that makes every other cordless tool you think you'll ever want, so you can interchange batteries and chargers. I went with Ryobi, since they are the only brand that makes a cordless caulking gun.]
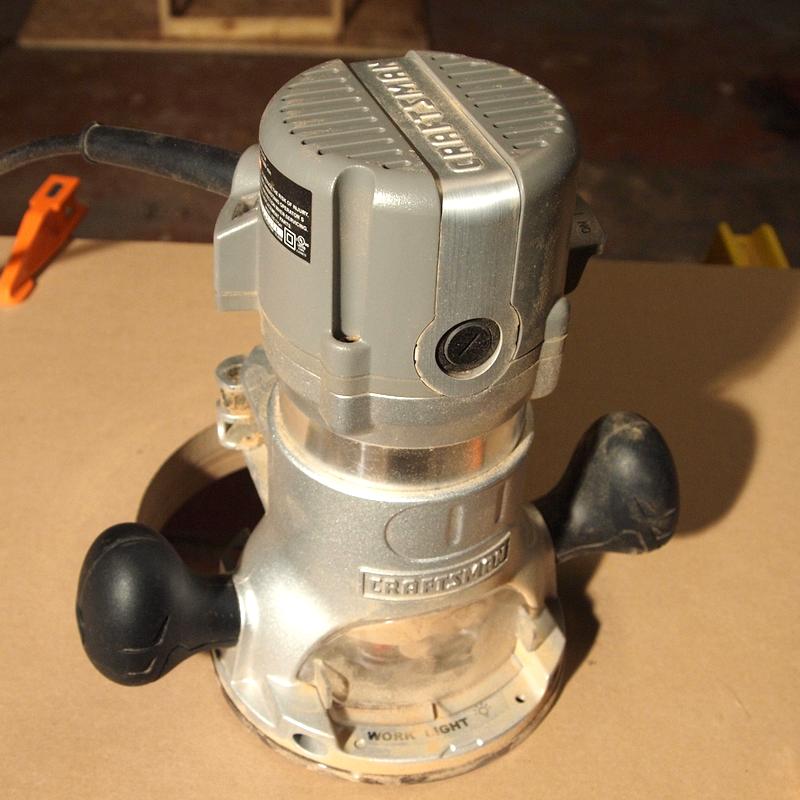 Fixed-base router
Mine is 1-3/4 HP, with both 1/4" and 1/2" shank capability. This must have a shop vac attachment. You will not believe what a phenomenally huge mess a router can make, even with a three-horse shop vac scavenging 90% of the sawdust. Another Craftsman find, and it works pretty well. Mine had LED lighting, which is handy but by no means perfect. Routers aren't very visual tools; you spend most of your time squinting through a little 1x3" plastic window that's half covered in sawdust at the best of times, so every little bit helps. You'll need four or five different bits for this project, but the two to start with are a 1/4" flush trim bit and a 1/2" shaft, 1" long flush trim following bit (with a bearing on the end.) Estimated cost for these three items: $120. The other three bits: 5/8" roundover following bit, a 1/2" x 1-1/2" flush trim following bit, and a 1/2" rabbet bit. Figure another $40-$50 for those. All bits should be tungsten carbide edged or they will wear out/burn up before you finish your first pair of speakers.
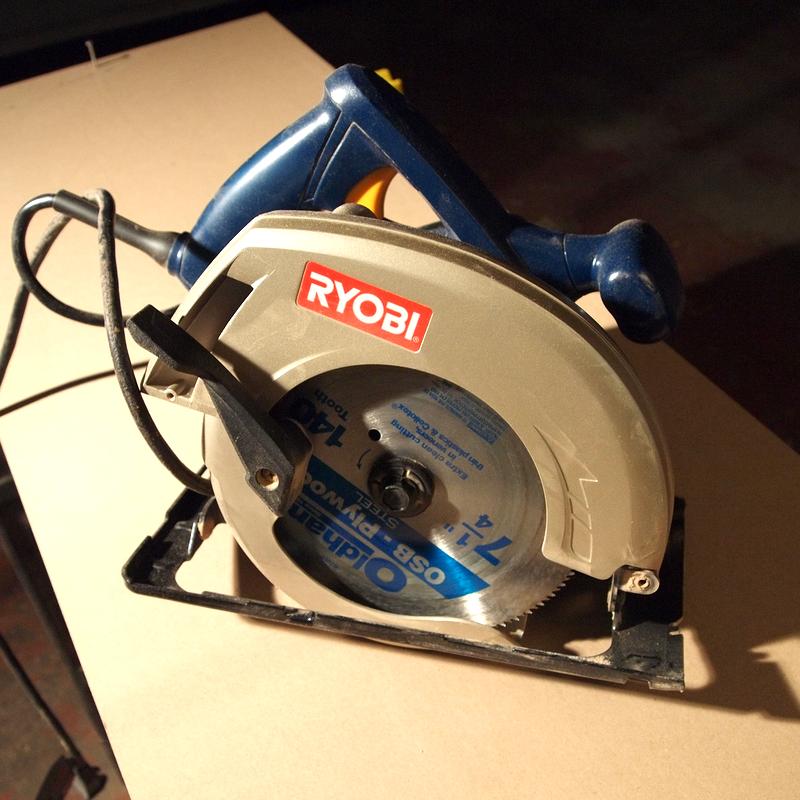 Circular saw with MDF/plywood blade
I went with a $40 Ryobi from Home Depot that uses a 7.5" blade. If you can find one that comes with a shop vac attachment I would highly recommend it; mine didn't, and the attachment is hard to come by, so it makes an unholy mess whenever I use it. The blade was an Oldham, but I don't think it matters especially, except just like with the router bits, you'll want carbide teeth. Should be about $5-10. Estimated cost: $50.

I hunted around for a while and found that Lowe's had the best price by far for a 6-gallon 3-hp Shop Vac brand model. You'll want something at least this big, which you'll understand the first time you open the unit up and see that the pleated paper filter has turned into a solid block of wood. This is used not just for cleaning up after yourself (though it is pretty good at that!) but also as an attachment for your power tools to scavenge the better part of the sawdust before it's thrown into the air, your face, the floor, and everything else. You can also clean out your car with it and extract water from carpet, but that's tangential. Shop around for this one; prices are all over the map. Estimated cost: $35.
Not as expensive tools
This is where things stop being quite so obscene. You'll need a lot of little bits and pieces like this, but you could try Harbor Freight and probably cheap out on a lot of it.
 Saw table
This is nothing amazingly fancy, just a folding table with a couple of horizontal slats of wood that can be screwed together. Mainly you'll be using it as a horizontal surface to clamp things, in combination with the saw horses. I got lucky and found one on sale for $12 one winter before I even thought up this project, but they're not too bad even if you can't do the same. Estimated cost: $20.
The things you're working on are big; these will be extremely useful as props all over the place. I perused Home Depot for a long time agonizing about these, because I have this deep-seated need to get the Best that I can afford, but I was also keenly aware that I had other things to buy as well. I ended up getting the flimsiest imaginable plastic ones, sold in a pair, and I have to say I'm actually pleased with that decision. I wouldn't want to fight big heavy sawhorses when already fighting big heavy pieces of wood, and these match up within a couple inches of the height of my saw table. Estimated cost: $20. [Editor's note: many years ago I bought four steel brackets that turn 2x4s into sawhorses in the size of your choice. I put the legs at slightly different distances so they nest to hang on the wall easily. Cost is similar]
 At least three 24" bar clamps
These are big steel things, like +1 adjustable-length C-clamps of Slaying. These were about $11 apiece at Home Depot; if I were looking today, I'd probably see if I could find some cheaper ones. You don't want these to be the quick-grip trigger type; the screw ones are much more clampy[Editor's note: I concur - the quick grip clamps are useless]. If you're feeling rich, more is better, as you will be able to complete the bracing part of the project more quickly. Estimated cost: $35.
 A fistful of much smaller clamp/spreaders, 8" or so - trigger type ones are fine. Harbor Freight had a sale on these for 99 cents each, which is about what they're worth, but I got enough of them to take care of business even if a couple broke. You might see if you can find better ones; if I had found some for twice as much that were both spreaders and screw type, I'd have paid it. Estimated cost: $10.
You'll want a flat 24" L-shaped square, and an 8" or so speedsquare. The latter has a lip on one side that you can hook over edges. They're typically about $5 apiece; my big one is steel and the speedsquare is safety orange plastic. Estimated cost: $10.
I got an 8-foot straightedge that came in two pieces. It needs to be braced in the middle and is still about 1/16" off at the best of times, so use with care. If you can, an appropriately sized length of angle iron or aluminum might work just as well. Estimated cost: $10.
This can be as cheap or expensive as you see fit, so long as it's got a lock on it and a hook on the end. Estimated cost: $5. [Editor's note: get a 25 foot one that automatically locks, pulls out easily, and has a lever/button that releases and rewinds the tape. You'll use it forever, or until you cut the end off. $12.]
Unlike the materials, which you might be able to get a little at a time until you're sure you want to go through with the whole project, you'll actually need many of these right away, so go ahead and secure these first. Then let's have a look at what you're actually going to put into the boxes.
Framework - Inner panels - Woofer holes - Bracing - Assembly
End caps - Outer panels - Odds and ends - End caps redux - Paint
Trim - Grills - A Year With the HUMAN 1000 - Epilogue
Starting - Tools - Materials
First cuts - Frames - Inner panels
Woofer holes - Bracing
Assembly - End caps - Outer panels
Odds and ends - End caps redux
Paint - Trim - Grills
A Year With the HUMAN 1000
Epilogue
Materials
Here's everything you need to put together the kit pretty much as I have. I didn't get this stuff all at once; I wasn't at all sure I'd be able to complete the project, and I hoped to only sink into the quicksand so far before scrambling out. This part is the consumables - the things that will go in and never come out, unlike the tools, which you will be able to keep or resell at the end of the project.
Big things
Medium things
Little things
 Three pounds of screws. I used a particular type that I think you should also use; it is very frustrating and difficult to drive traditional screws, especially when you're using them to clamp wood with rapidly-stiffening glue. The ones I found are SPAX brand #8x 1-3/4" MDF screws: they come with a bit, and have a self-guiding Torx head, spade point, and just generally do not give you any shit. $9.50/lb box at Home Depot. Estimated cost: $30.
Framework - Inner panels - Woofer holes - Bracing - Assembly
End caps - Outer panels - Odds and ends - End caps redux - Paint
Trim - Grills - A Year With the HUMAN 1000 - Epilogue
Starting - Tools - Materials
First cuts - Frames - Inner panels
Woofer holes - Bracing
Assembly - End caps - Outer panels
Odds and ends - End caps redux
Paint - Trim - Grills
A Year With the HUMAN 1000
Epilogue
First cuts
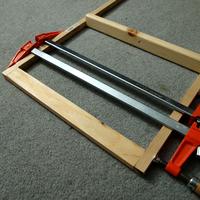
Your first step is to cut the smaller pieces that you'll need to build a box frame. This is the ladder-like structure that will be the basis for the whole project: the long, 3/4" square uprights held together by seven 1x2 crossbeams on each side. By making a frame out of easier to cut parts, it will become (relatively) trivial to accurately cut the heavier and more expensive parts later on; additionally, you'll be able to install the internal bracing into the frame instead of trying to wrangle the big panels.
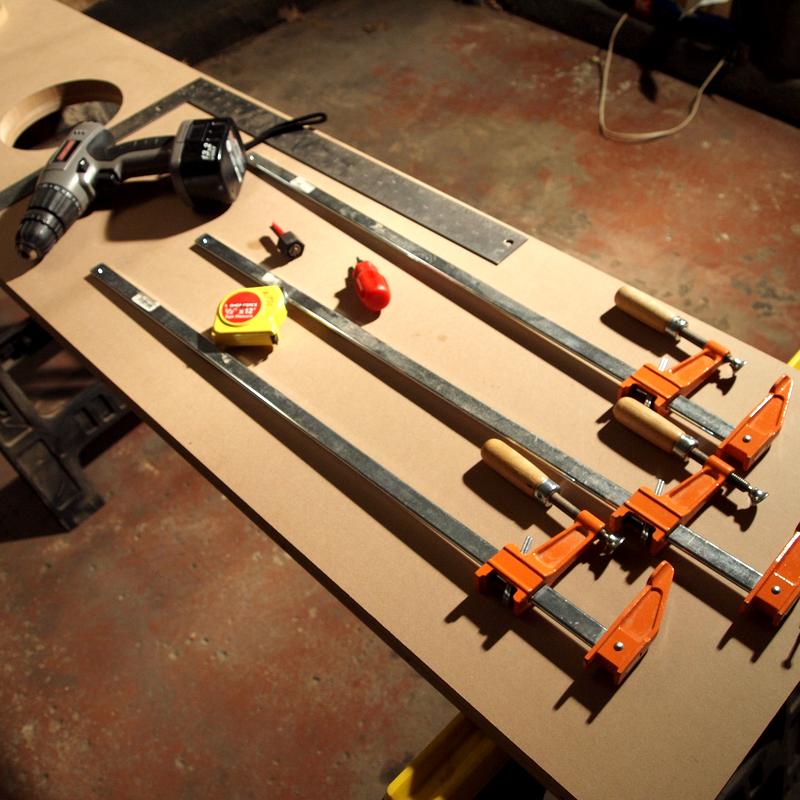
These are the first things you'll be cutting, and also the cheapest, so you can get familiar with some of your tools on 75-cent materials instead of the expensive stuff you'll be hacking through in a bit. For this part you'll need your circular saw, saw table and sawhorses, at least three bar clamps (whichever are the sturdiest, screw-type is required), the speedsquare, sanding block with attached coarse sandpaper, and measuring tape. A pencil will also be useful; one thing I learned is that you can never have too many marks to remind you where things need to line up. You'll also need the eight 3/4" square molding pieces and your ten 1x2 boards.
Before you begin, you'll want to do some preliminary checks with your saw. Using your speedsquare (and then performing a test cut and doublechecking) make sure that your saw blade is exactly perpendicular to the base. It may not be possible to get it exact, but the closer you can get, the happier you will be later on. Also make sure you have the depth of the cut set properly; you'll want it to be able to go through the long edge of your 1x2 boards without extending too much further. This is both for safety and to reduce the likelihood of the blade catching and ruining things. [Editor's note: this is also the correct depth setting for a circular saw - just enough to reach through the work.]
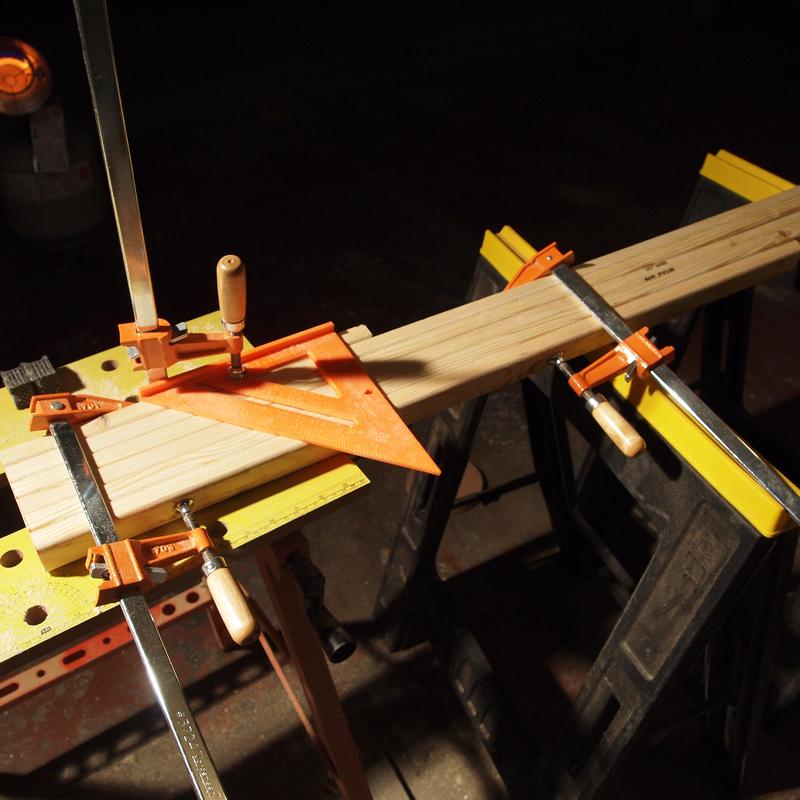
- Set up the saw table and sawhorses. You'll be cutting five 1x2 boards at a time; line up one end as close to exact as you can possibly manage (your speedsquare will help) and clamp just a few inches from that end. And clamp again about two feet down, again as close to even as you can manage.
 Mark off, to either side, exactly 14.5" from the end of the first board, right on the edge. Using the speedsquare and circular saw, determine where the blade's going to catch when it goes in (make sure you're guiding it in straight), and hold the square in place. Mark it every which way and then use a clamp to fix it solidly to that first board. That will be the master; don't unclamp this for the rest of the procedure.
- Make a test nick with the saw and make sure it's right, just 1/8" into the wood or so. Take your time and adjust it as close as you can manage.
- Hold the saw in one hand and hold solidly to the square with the other. Saw through everything.
 You can now remove the clamp on the very end (not the master/square clamp) and move everything down. Re-clamp a couple feet down as before, then remove the end clamp and re-clamp with the master board lined up exactly with the new end of the work. With this technique you can make all your remaining cuts relatively easily -- since some part of the work is always clamped, you don't have to do the tedious parts very often.
- Check everything for length and squareness; sand anything down that's not pretty much dead on, or things will get weird when the frame is assembled.
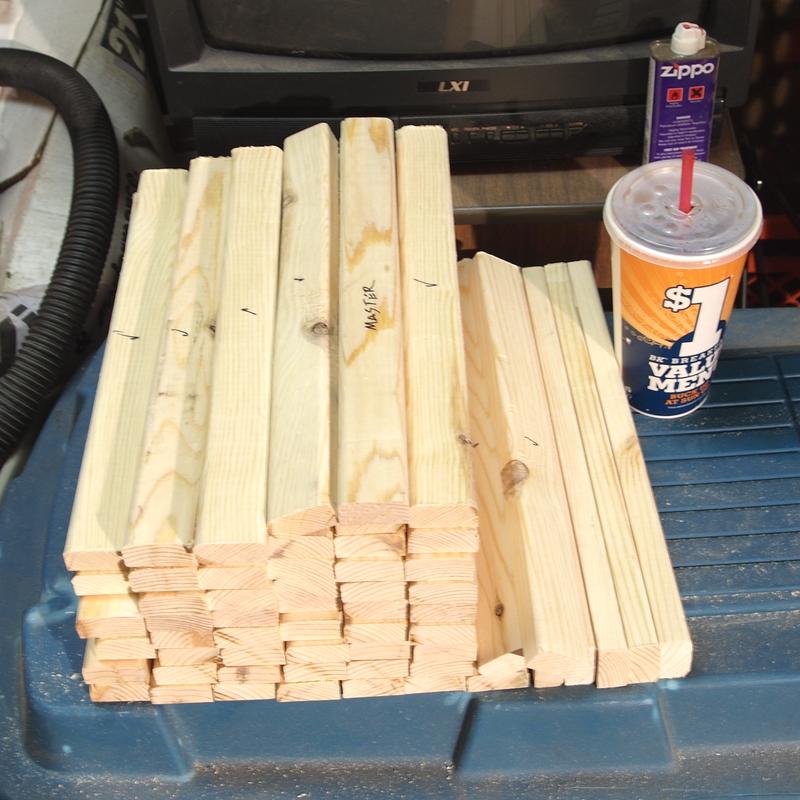
- Keep going until you hit the end of that set of boards, then start over with the other five. Pretty soon they'll be a nice little pile of firewood, with some extra little pieces left over to practice with. You should end up with sixty 14.5" boards in total.
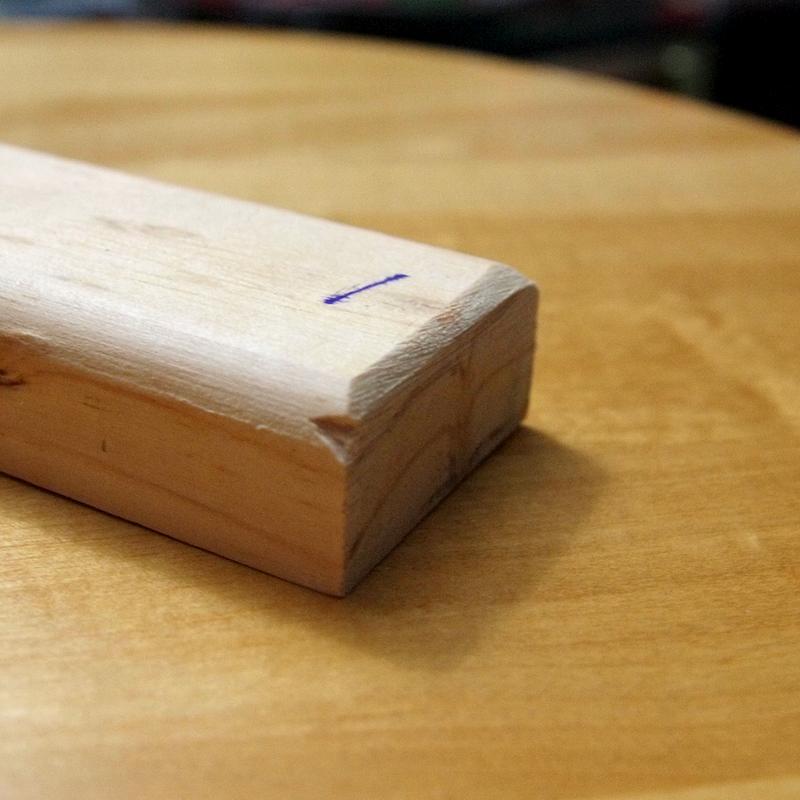
 Your boards will probably have one side with nice rounded corners and another side that has sharp 90-degree edges. That flat face will be facing out when you assemble the frame. Make sure you sand down the inner edges as shown, so they don't interfere with each other and cause strange geometry problems.
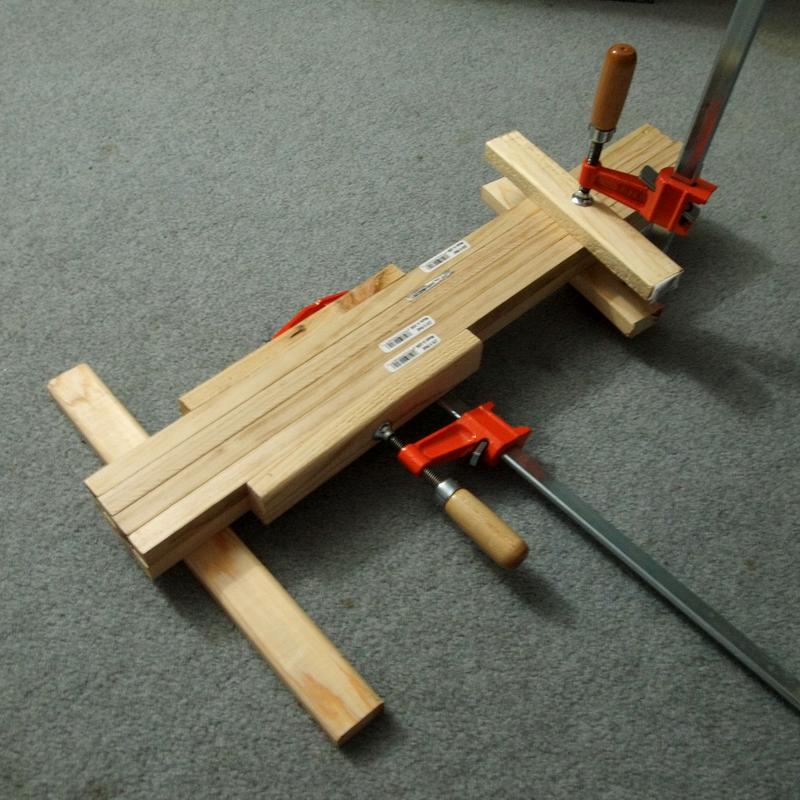
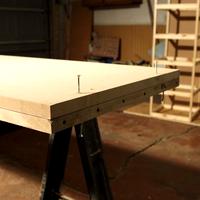
 Finally, you'll be cutting the uprights. These need to be exactly 72" long. So that you don't have to adjust the cut depth of your saw or change anything else, it's easiest to stack them two high and four deep. To keep everything in line, you can clamp them with your bar clamps. I sandwiched the uprights between a couple of spare 1x2 blocks in a few different spots to force everything into line (but failed to take pictures when I was doing it; this shot gives you a good idea of how it'd work though.) The rest of the measuring and cutting procedure is exactly the same as it was with the crossbeams.
Now that you've got everything cut down, make extra doubly triply sure that everything is both a) identical in length and b) square in as many ways as you can measure. It's better to lose a 'steenth and have it square than to have your frame bending into awkward shapes when you put it together. Even then, I wasn't able to get mine exactly right, but it's well within Close Enough territory. After that, take a well-deserved break, steel yourself, charge your drill, and turn the page.
Framework - Inner panels - Woofer holes - Bracing - Assembly
End caps - Outer panels - Odds and ends - End caps redux - Paint
Trim - Grills - A Year With the HUMAN 1000 - Epilogue
Starting - Tools - Materials
First cuts - Frames - Inner panels
Woofer holes - Bracing
Assembly - End caps - Outer panels
Odds and ends - End caps redux
Paint - Trim - Grills
A Year With the HUMAN 1000
Epilogue
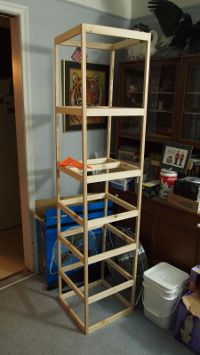
Framework assembly
Before you begin, let me ask you once more: did you make sure your 1x2 ends were square? And you'll also want to line up the uprights on one end, clamp them down, and make sure the other ends line up; sand anything down that doesn't. This is actually more critical than the ends of the crossbeams.
This part will result in your first three-dimensional construction, the relatively light inner framework, which will look like a big box kite. It's the least permanent, most flexible part of your work, and the first product that will be of endless interest to your housecat. And it's also clean enough to be done indoors if it's too cold (or hot) outside.
For this section you'll need your pencil, big clamps, speedsquare, drill, and measuring tape. You'll also want to break out your first box of screws and install the bit for them. Turn the drill to its lowest torque setting; you don't want to strip anything out at this point if you can help it. Also take a look at how the screws lock onto the bit, so you can see the difference between one that's properly seated and won't go all wobbly, and one that isn't and will. We'll be doing one frame at a time; once you've finished one, doing the other one will be even easier.
- With four of the uprights clamped together, use the measuring tape and speedsquare to mark off the places you want to put the crossbeams. Then roll all the uprights 90 degrees, clamp again and mark that side as well (you want two adjacent sides of each upright to have marks scribed on them.) Huw recommends at least five braces, all spaced irregularly; I lost the original measures for mine, but it's something close to these inches from the bottom of the upright to the bottom of the crossbeam: 9.5", 20.5", 30.25", 40.5", and 54.75". That will provide an OK spread of irregular lengths between braces, hopefully reducing the cabinet's likelihood of adding its own refrain at certain pitches. One set should end up just below the woofer holes, and one just above them.
 Lay out two uprights and choose the very straightest two of your crossbeams. It's a little tricky (sometimes, as shown, it helps to have another crossbeam set up so the uprights don't fold in on each other) but you want to clamp it down so that everything is exactly flush; the flat face of the crossbeam needs to be flush with the uprights, and the long edge needs to be absolutely flush with the ends of the uprights on both sides. Once you've got that, clamp firmly and drive the screws, both into the lower half of the 1x2 so that you have room to screw on the adjacent sides. Using the same method, close the rectangle by installing another crossbeam at the other end of your two uprights. [Editor's note: drilling pilot holes (with your second cordless drill) will help to avoid splitting. You can get a fancy pilot hole bit that does the countersink, the through hole for the first piece, and the pilot for the second, all in one operation.]
- Now you will have two long flat rectangles: the next trick is to turn them into a prism. You'll want to have the two rectangles laying on their edges, on the levelest, squarest surface you can find or create, with the flat faces of the crossbeams facing out. There's a fair amount of fumbling here, and three or more hands (perhaps with a helper) will be of service. Again with the flat face of the crossbeams facing out, you'll want to screw them into place at the top and bottom (driving screws into the upper half of the crossbeams this time); then flip the entire confabulation over and do the same to the other side. Congratulations, it is now a rectangular prism capable of standing on its own.
- Pick a side and mark its lower beam "< MASTER / BOTTOM v". This is a reminder of which side is up, and also which corner's scribe marks you will be trusting the most (it is very easy to not draw a straight line, even with a square.)
- Line up a crossbeam with the scribe marks on the master side, clamp lightly, and use the speedsquare to make sure everything's square on both sides. Then clamp tighter, double check, and drive the screws. Follow the upper half/lower half pattern you started when assembling the bare frame.
 You can use the speedsquare to snug up against the master-side crossbeam and put the two adjacent sides in their place, but make sure you also square it against the uprights. The opposite side may not line up exactly, but treat that aspect like government work and just make sure it's square with the uprights.
- Just keep working your way from bottom to top. When done, you can make two extra passes with increasing torque limits on the screws that still aren't flush (if you didn't drill countersinks); make sure to apply firm pressure to keep from stripping anything.
- Unless you are very good, the frames may end up twisted slightly in strange but visible ways; as long as it's something you can force back into place by hand, and you did a good job lining up the crossbeams and uprights on either end, it's something that will straighten out when the panels go on.


I found this part to be tremendously satisfying; it wasn't all that expensive, and it was far easier than trying to eyeball enormously long cuts through expensive materials. What's more, it lays the groundwork for the most important part of the project: making these things too heavy to lift. I would stop, admire, take pictures, and take some slow sips of Faygo grape soda: this is the last time you'll be able to swing your project around single-handed.
Framework - Inner panels - Woofer holes - Bracing - Assembly
End caps - Outer panels - Odds and ends - End caps redux - Paint
Trim - Grills - A Year With the HUMAN 1000 - Epilogue
Starting - Tools - Materials
First cuts - Frames - Inner panels
Woofer holes - Bracing
Assembly - End caps - Outer panels
Odds and ends - End caps redux
Paint - Trim - Grills
A Year With the HUMAN 1000
Epilogue
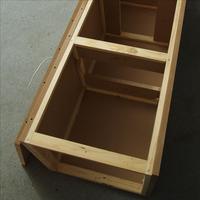
Inner panels
This part addresses the inner layer of MDF, the first part of the operation that will force everything to square up and start forming the airtight seal of the cabinet. Right now what you'll be doing isn't going to be permanent, but it is going to form the foundation for actually beginning to glue things together in the next section. You'll be cutting the big vertical panels to fit nearly exactly to the frames you've built. From the outside, these will look like butt joints; however, since they're going to be attached to the internal frame, they'll be much stronger than they look. It's also important to note that you'll end up with two cabinets that are exactly mirrored, as shown here looking down from the top.
 Refer to diagram: the light green and dark green are the inner MDF panels, showing the cabinet to cabinet mirror-imaging; purple are the 1x1 uprights, and orange are the 1x2 cross pieces.
It would be fair to say I made this section up; I tried to cut my panels 'freehand' before I was even pointed toward building frames first, and they were not unlike a trainwreck as a result. Getting everything cut squarely and especially trying to make those long, long cuts without some sort of runout in the middle was a near-impossibility. So if I were doing it again, this is exactly how I'd do it; however, since I didn't, this part is light on pictures. You'll need both your squares and that long straightedge, along with at least three bar clamps, the circular saw, cordless drill, and more of those fabulous screws. The frame is best laid out on its side, preferably on an old rug or something other than your filthy, oily garage floor. Don't you ever clean that thing? What a wreck. Your mother would be ashamed.
In particular the way this will work is that you'll line up a panel flush with the edge of the frame on two sides, and then saw off the excess that hangs over the other sides. The trick is, to get it exact, you have to have at least two panels on already (since you need to account for the next side when you're trimming down the first.) But it's not so bad once you understand it. For now you'll just be doing rough cuts; the bottom and one side will be exact, and the top and other side will be just sorta close, so you can trim it down 100% exactly when you start gluing things together later.
- Using your square, both the speedsquare and the big one, make sure that one or the other short end of the MDF panel is square with one of the other sides. Some part of it should be square; you will want to line that corner up with the lower left corner on the upward-facing side of your frame [Editor's note: usually the "factory" edges will be square.]. Line up that whole bottom edge exactly with the bottom edge of the frame, making sure it's totally flush, and clamp it down. Drive two screws through the panel and lower crossbeam (pilot holes start to help much more now, since the MDF is much harder to bury a countersunk screw into by sheer force), as far out to the left and right sides as is practical (remember you've already got a couple screws in that crossbeam holding the frame together.)
- Then saunter (or perhaps swagger) to the other end of the frame, and slide the top part of the panel so that the panel and frame are flush with each other down the left side. This will force the frame square (at least for that one side!) -- clamp again up top, and drive a single screw through the center of the top crossbeam. Now you've made a triangle that will hold steady for cutting and fitting purposes.
- Roll the whole frame to the left, and repeat 1 and 2 for this adjacent panel; now you will have an overhang on two sides, and sawhorses (or some other supports) and probably helpers are in order.
- Now you can flip back to the first side and use your long straightedge to mark out where you want to cut. You will want it to be 1/8 to 1/4" over the end of the second board; this will require measuring, test cuts, extra bracing in the middle of the straightedge, and so forth. Go slow, measure, stop partway through to make sure you're doing it right, etc. Much more than 1/4" and it gets hard to rout down; conversely, less than zero and you'll be damaging the next panel.
With similar technique you can cut off the excess along the top side of the frame; this is easier since you don't need a top panel installed to do it. Again, 1/8" to 1/4" away from being flush.
- Now you can turn the frame to the next panel and keep going, following those previous two steps til the other three panels are rough cut. Make sure you clamp the middle of the frame to the panel as it lays in resting position, so that the relatively weak frame doesn't shift as you're trying to cut.
- Clearly mark the outside of each panel and the top crossbeam A1, B1, C1, and D1 (A2, etc. on the second cabinet), so that you can match everything up exactly later. A magic marker is good for this. Also mark your "perfect" edges and their shared corner.
- Using your big square, scribe lines on the outside of each panel marking the center line of each crossbeam, and the center line of each upright. It doesn't have to be exact, but it should be pretty close. This will save you a step at final assembly, when you'll be much busier.
- The other frame will proceed the same way, except you will want to reverse it: align the first panel's lower right corner with the frame, rather than the lower left, and work turning left. This will make both cabinets exact mirrors, and make the woofer holes easier to duplicate in the next part.
Now remove the panels in order to do the next step.
Framework - Inner panels - Woofer holes - Bracing - Assembly
End caps - Outer panels - Odds and ends - End caps redux - Paint
Trim - Grills - A Year With the HUMAN 1000 - Epilogue
Starting - Tools - Materials
First cuts - Frames - Inner panels
Woofer holes - Bracing
Assembly - End caps - Outer panels
Odds and ends - End caps redux
Paint - Trim - Grills
A Year With the HUMAN 1000
Epilogue
Woofer holes
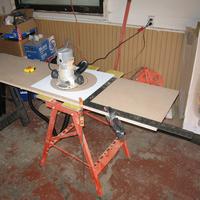
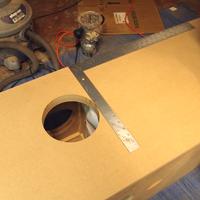
This part is actually fairly easy and fast, but you will still need to take your time with it. The first part takes a little bit of groundwork: you'll need some sort of way to cut circles with your router. Many routers have a compass attachment, but since I only needed a couple size circles, and fairly exact measure, I chose a novel approach: I did some math and then had a local frame shop (Rainy Day Art Supply in Grosse Pointe, MI) cut a circle out of matboard for me. That way, I could just clamp the mat down exactly where I needed it, and use the regular 1/4" trim bit to follow it around. Then, after getting the first cut perfect with that, I could use my following bit and make exact duplicates for all seven other boards. Simple! [Editor's note: you can also get an attachment that replaces your router base that allows circle cutting in a series of 1/16" incremental choices using a center pilot hole.]
This section requires your drill and screw bit, the router (or two routers) with both the trim bit and the following bit, large and small clamps, a means of measurement (and probably your L-shaped square), and sawhorses.
 I used a 1/4" straight router bit, and my router's base diameter is 6". Some math will determine the appropriate size of the circle for your rig. The shop was pretty understanding; I explained that I didn't care about color or outer size, merely that the inner diameter had to be exact because I was going to use it as a jig. They were amused but understanding, and got things remarkably close.
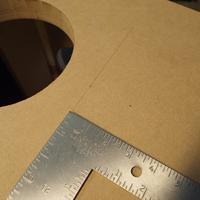
 Now that you have the mat, with some careful measurement you can figure out where to put it; it needs to go so the vertical center is 26" from the bottom of the panel, and a couple inches off center - to the left for one cabinet, and to the right for the other. (Remember, the total width of the box is going to be 3/4" wider on one edge, because of the adjacent panel. Total box width with that edge is 17.5"; half that is 8.75", minus two inches is 6.75", minus the edge is 6" from that side of the board.) Once you have it figured out, four or five little clamps should hold the mat down just fine. Here in the picture I've used a squeezy clamp to help hold my L-shaped square in place, which is in turn keeping the mat where it needs to be.
[Editor's note: with the "full box" technique, clamping the mat will be hard - you could either screw it in place, or use the afore-mentioned circle cutting router base attachment.]
- I have a fixed base router, but I just turn it on and hold it up off the work surface until it's up to speed and then gently let its own weight sink the bit through the panel. As shown here, you could also drill out a hole first, but I found that wasn't really necessary. Then follow the jig around clockwise, paying lots of attention; you don't want to jump the mat, and it's surprisingly easy to do. Soon enough, you'll have cut out a nice little wood circle that you can throw at the neighborhood children.
- The wonderful thing about a router is that one doesn't need to measure twice and cut once for every single panel. You have eight of these things to do; just use the router or drill to open up a hole in near the edge of where the cutout should be on the other seven panels.
 Then clamp each panel to this first one in turn and use your following bit to duplicate the cut. Swift and accurate, and you only have to worry about following the jig once. Just make sure when you're lining up the boards that you're doing so on the sides you know are accurate (the ones you marked above), rather than the ones you only rough cut.
 Just make sure that for the other cabinet, you clamp the boards outer face to outer face, rather than front to back; this will mirror the offset perfectly. (Ignore the drill holes in the one panel in this photo; that was from a previous, failed experiment.) Again, line up with the known good sides rather than the rough cut ones.


Now that you've got the woofer cutouts done, go ahead and reinstall three of the panels on each cabinet. Next we'll turn our attention back to the guts and start working on the inner braces that will really give the structure its rigidity. I won't blame you for stopping here and admiring your handiwork; the next step is fiddly and a fair bit longer, with fewer immediately satisfying results.
Framework - Inner panels - Woofer holes - Bracing - Assembly
End caps - Outer panels - Odds and ends - End caps redux - Paint
Trim - Grills - A Year With the HUMAN 1000 - Epilogue
Starting - Tools - Materials
First cuts - Frames - Inner panels
Woofer holes - Bracing
Assembly - End caps - Outer panels
Odds and ends - End caps redux
Paint - Trim - Grills
A Year With the HUMAN 1000
Epilogue
Bracing
This section covers the internal bracing that will be installed in the frame, which has several important features: the box have added mass and physical strength, the panels will be much more resistant to resonating, it will help support the damping material, and it will (hopefully) reduce the likelihood of standing waves building up inside.
There are several ways to make braces; they could be formed out of lengths of 1x2 wood, for example, or an entire shelf could be made out of MDF. What I've done is ever so slightly less effective than a full shelf brace, but more importantly it's easier to cut down to size and install, and uses up some of that otherwise-worthless remaining wood from when you rough cut the big panels. You'll end up with twenty MDF rectangles that all have notches cut out of a couple of corners, and both glue and clamp them into place within each of the five middle crossbeams.
For this section you'll need your L-shaped square, speedsquare, circular saw, router with following bit, sawhorses, saw table, and clamps, along with a pencil and marker. Some mechanic's wire would be extremely handy (though zip-ties will work in a pinch) and a bottle of wood glue is also required for installation. As for the wood itself, you'll be using the six-foot lengths that you rough cut from the panels.
- Using the same measuring, clamped/marked square, and circular saw method used to cut the crossbeams several weeks or months ago, you can create and duplicate the braces you'll need. They should start off close to each other in width, eight inches or so by six-plus feet.
- Measure and cut out ten pieces to 14.5" each. Letter them all with a sharpie so you know which long boards they came from; this is so you can keep the internal cabinet volumes identical. So with the first large board, label all the pieces "A", the second board's pieces "B", and so forth.
- Using the L-shaped square as a guide, cut each of the ten pieces lengthwise, as close to in half as you can readily manage. Make sure each pair is numbered; you should end up with pairs labeled A1, A2, B1, B2, etc. Each pair will end up forming the bracing for a single crossbeam level.
- After they are all cut, choose one long side and cut about an inch off the corners at a 45 degree angle, so you're not fighting the corners of the framework to install them. You only have to do the two corners that will face the corners of the frame when installed. To do this, I just used my speedsquare, lined up the five degree hash mark on the 45-degree side, clamped and cut it off with the circular saw.
- Grab one cabinet and start sticking the braces in here and there to make sure everything is actually going to fit. They should be snug, but also square, and not bow out the crossbeams (unless, of course, the crossbeams are bowed in -- this is cheap wood we're talking about here.) Sand or rout to fit exactly; hopefully you won't have anything undersized, just over. Ideally the boards will stay in place just from friction, but I was only that lucky in a few places. I'm sorry I don't have pictures for any of this first part, but apparently I forgot to take any!
 To make the cabinets sound as identical as possible, I sorted out the braces in an alternating fashion. My uncut boards, when cut down, formed four pairs per, so I ended up using three, and had pairs labeled A1, A2, A3, A4, B1, B2, B3, B4, and C1 and C2. So from bottom to top, I had A1, A3, B1, C1, and B3 pairs in the left cabinet, and A2, A4, B2, C2, and B4 pairs in the right cabinet (note that I matched the order of A, B, and C pairs between the two cabinets in order to make the airspace inside as similarly shaped as I could.) Each level will be turned 90 degrees from the last, just as shown.
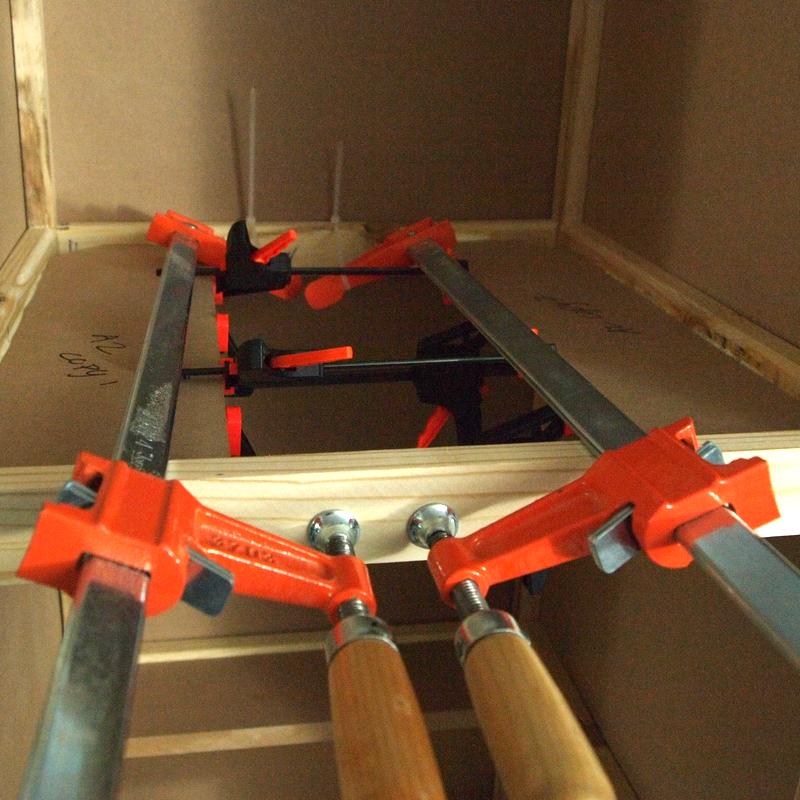
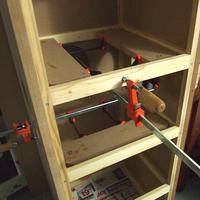 With three panels installed, everything should still be pretty square, and you can get to work putting in the braces. Choose the very best-fitting ones for the area right above and below the woofer cutouts, and using plenty of glue, fix them into place, each one to three pieces of 1x2 framing. I used two spreader/clamps to hold the two pieces out against the sides, and a long bar clamp through the woofer hole perpendicular to the spreaders to put pressure on the other two sides.
- Leave adequate time for the glue to dry before removing the clamps.
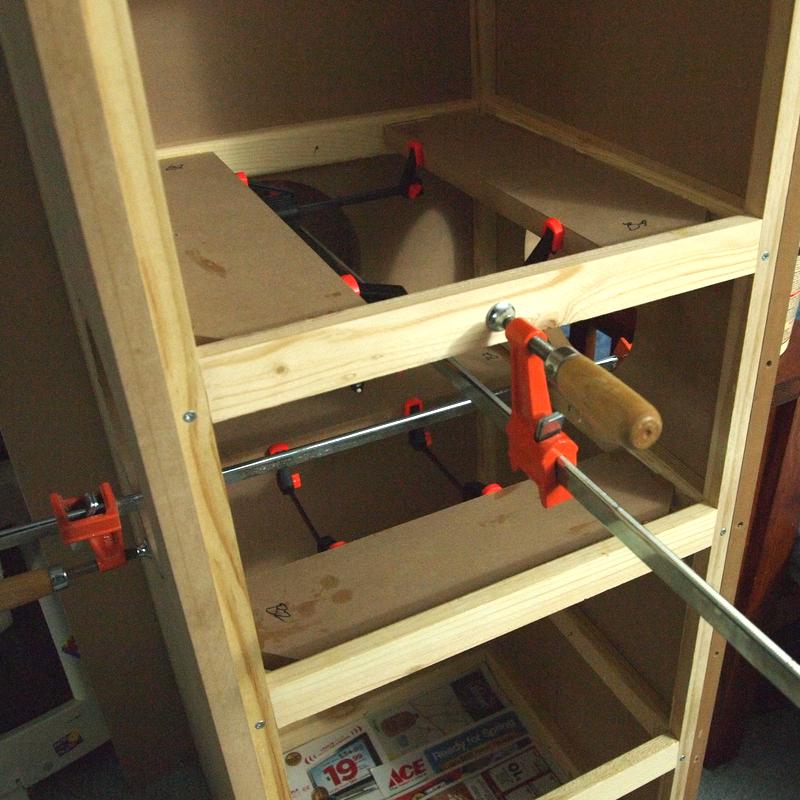
 Be creative with clamping for the rest of the bracing. If they hold very tightly, you might be able to get away with just the spreaders; if not, you should have enough spare wood by now to clamp around the outside of the cabinet without having to mess around with removing any more panels. I used some particularly sturdy zip-ties to take care of the clamping in two locations (though mechanic's wire would have been a much better option) and just the spreaders in the remaining one.
At this point you might take a little intermission and measure up your braces, along with all the framework, and see how much volume you've used up. The frame as described takes up about 619 cubic inches, and in my case the braces used up another 400 or so. This brought the cabinet volume down to 10.07 cubic feet, which is just about right. The woofer cutouts will add a little bit, and the woofers themselves will take some away, as will the damping material [Editor's note: arguably, the damping material, or stuffing actually adds to the apparent volume.], but on balance, even with the extra brace work, I'm about where I should be. If you're significantly over, consider adding more bracing or some other sort of ballast, but you should be pretty close.
Your next step is screwing things and getting sticky; this is going to be fun. The parts count is also going to go down radically; everything you've produced so far is going to be distilled into two boxes without topses.
Framework - Inner panels - Woofer holes - Bracing - Assembly
End caps - Outer panels - Odds and ends - End caps redux - Paint
Trim - Grills - A Year With the HUMAN 1000 - Epilogue
Starting - Tools - Materials
First cuts - Frames - Inner panels
Woofer holes - Bracing
Assembly - End caps - Outer panels
Odds and ends - End caps redux
Paint - Trim - Grills
A Year With the HUMAN 1000
Epilogue
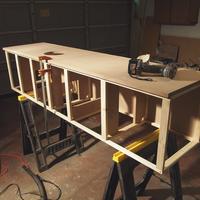
Assembly
This is the last section of Phase One; you will have formed all the parts you've made permanently into two boxes. Since it's not practical to clamp down this much stuff, instead what you'll be doing is using screws as a hundred little mini-vises to hold the panels tightly to the frame while the glue dries (and beyond.) You'll need two freshly charged batteries for your drill, two boxes of screws, two full bottles of glue, your pencil, marker, and L-shaped straightedge, sanding block, a boring magazine, and preferably a helper, too. Please ignore the spurious drill holes along the edges of the MDF; this is another example of me trying something, failing, and getting another chance to do it right later on.
 Lay the cabinet on its side, leaving all panels except one attached -- this will help the frame keep its shape, and reduce the amount of trouble it takes to reattach the panels when you have time working against you.
- On each side, figure out where the best places are to drive in screws. I used two into each crossbeam, and one into the uprights on either side just about halfway between each crossbeam. You will have interference between the adjacent panels when drilling into the uprights, so make one panel's screws an inch or so above halfway, and the adjacent panels will be an inch or so below halfway, leaving plenty of space. Scribe all of this with a pencil, using the lines you drew earlier to guide you, and then go back and circle all those crosses with a sharpie. The cabinet should go together as fast as possible, so any structural shifting has a chance to settle while the glue's not yet permanently stuck; you don't want to be hunting for pencil marks under pressure.
- Count out four sets of 24 screws and put them into shallow containers. I used some lids I had laying around. Make sure you have an extra bottle of glue and an extra battery for your drill; these things aren't going in by hand.
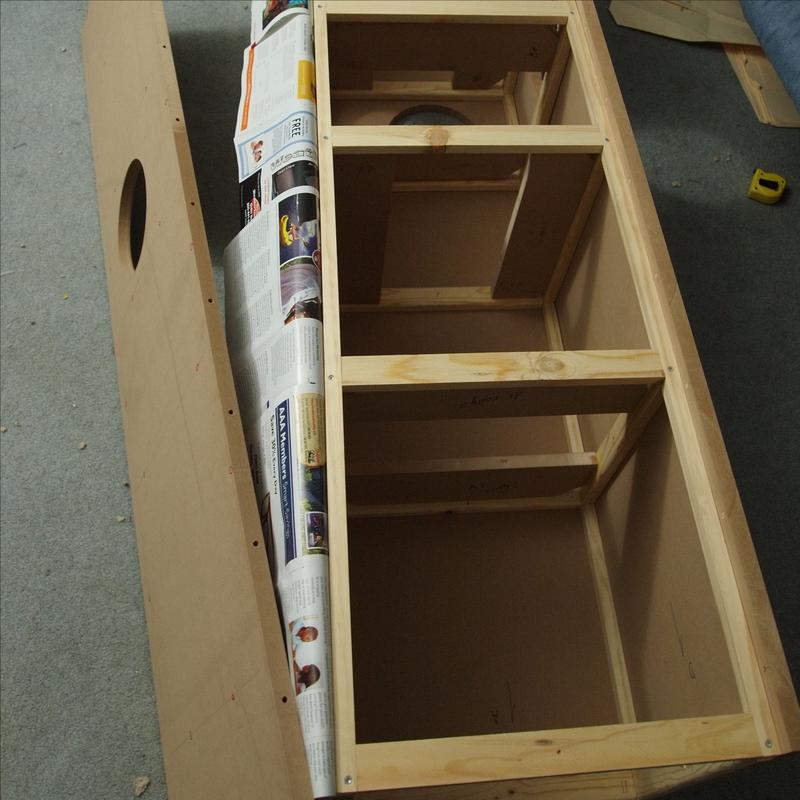
 With the removed panel side facing up, take some glossy magazine paper or wax paper (I used my roommate's AAA Living) and stick it down between the frame and the adjacent panel on the flush-fitting side. This is so you can get that last panel off when you need to.
- Get a bit of practice handling the panels. I left the bottom two test-fit screws in just enough that their drill tip was peeking out, making it a lot easier to get the bottom edge to drop into place. Then I could move to the single top screw and hold the panel in line while driving the screw in. It helps to line things up within a half inch or so by angling the panel down against the raised lip of the adjacent panel, and then lowering it into place.
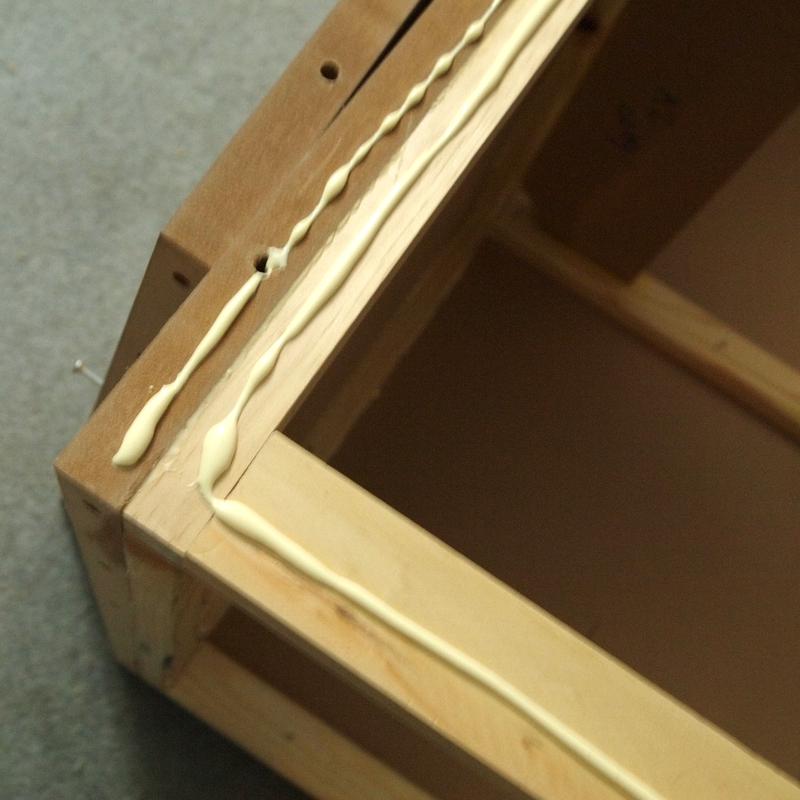
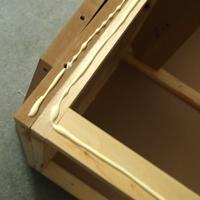 Line both uprights and all the crossbeams with a thick bead of glue. Make sure you cover the screw heads -- you don't want those to ever back out and buzz if you can help it!
- Working quickly, get the panel into place and screw it down with the test-fit screws. Then just work from bottom to top, driving the screws in as you go. Make sure to wipe the excess off when it squishes out the top and bottom.
- Turn the cabinet away from the corner you stuck the paper in, remove that panel, and proceed as before -- this time, though, make sure you add another bead for the flush edge of the first panel.
- Twice more and you're done. Remove the glossy paper for the last panel, and if you can manage, put a little bead along the raised joining face. Then, after you're sure you've gotten all the glue from the bottom, you can lift the cabinet upright to dry in the position it will forever stand.
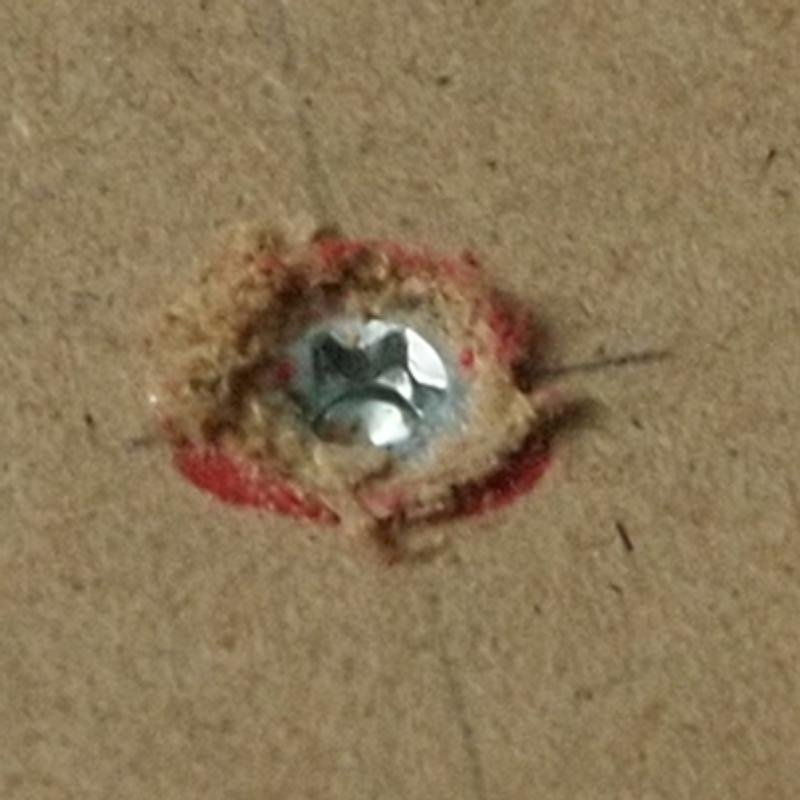
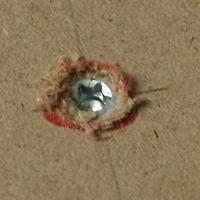 While it's up there, you can do what you did with the inner framework: make a couple extra higher-torque passes on any screws that didn't go flush with the wood. There's going to be one more layer of MDF on top of this one, so it needs to be at least flush, preferably countersunk a little bit; you can scrub over the screw with your sandpaper to see if it's in far enough (and to clean up the puffed-up mess of MDF around it.)

You are now firmly into Team Lift territory. 619 cubic inches of pine = 11 pounds; 3867 cubic inches of MDF = 94 pounds. Phew! That's it for Phase One. You're now halfway to structural completion -- at the end of Phase Two you could theoretically stop, hook up the drivers, and have some Serious Ugly in your living room. Don't do that; ugly is bad.
Framework - Inner panels - Woofer holes - Bracing - Assembly
End caps - Outer panels - Odds and ends - End caps redux - Paint
Trim - Grills - A Year With the HUMAN 1000 - Epilogue
Starting - Tools - Materials
First cuts - Frames - Inner panels
Woofer holes - Bracing
Assembly - End caps - Outer panels
Odds and ends - End caps redux
Paint - Trim - Grills
A Year With the HUMAN 1000
Epilogue
End caps
Have you taken some time off? That's good, because I did, months actually, while waiting for my parts to arrive. [Editor's embarrassed note: orders like this are now filled in a matter of a week or two, not months.] And compared to that wait, this and the rest of Phase Two went incredibly fast, over the course of a few weekends. By the time you get to the end you'll have completed the structural work on the cabinets, and if you install the drivers they'll sound as good as they ever will.*
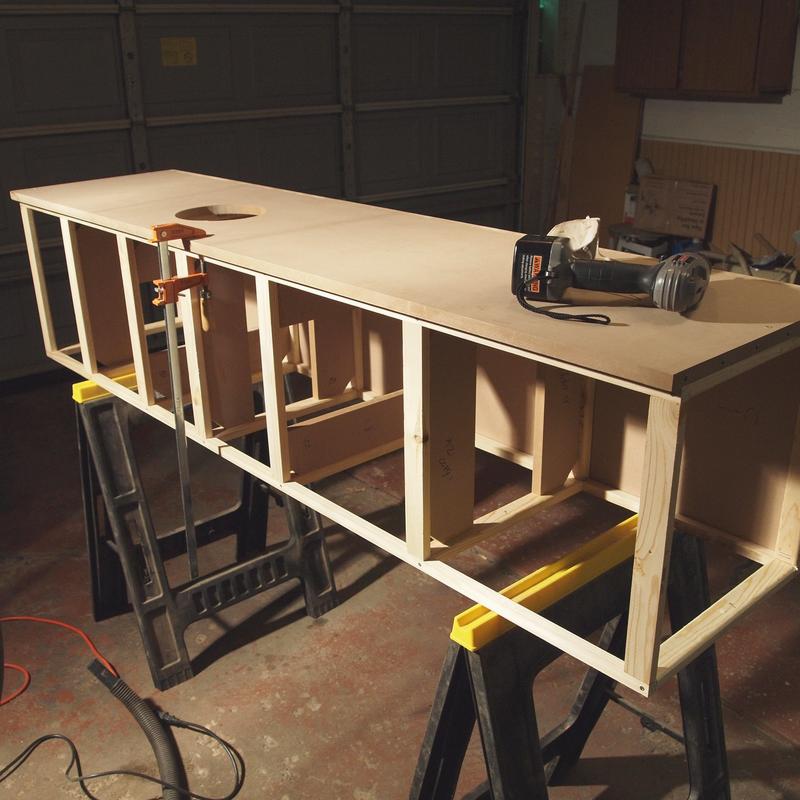
This section will leave you with closed, stuffed and partly sealed cabinets, and as accurate of a rectangular prism as you'll have been able to manage. You'll be cutting and routing the top and bottom end caps, and making the hole for the terminals. It'll help to have a ladder to get to the tops of the speakers, but in a pinch you can just lay one of the boxes on its side and stand on it. I had to do this part outside the garage.
- Make sure your box is right side up, for starters.
 So! Since we're cutting to fit instead of cutting to measure, this part is pretty nice, and doesn't involve squares or rulers. Take one of your spare pieces of wood and (with a helper it necessary) line it up atop one of the cabinets, nearly flush along two sides. Then use a pencil to mark a line along the two sides you're going to need to cut. You don't want to draw the line right up against the box; give yourself some leeway so you can rout it down exactly.
- Bring the panel back down to your table and clamp and cut along your lines with a straightedge guide.
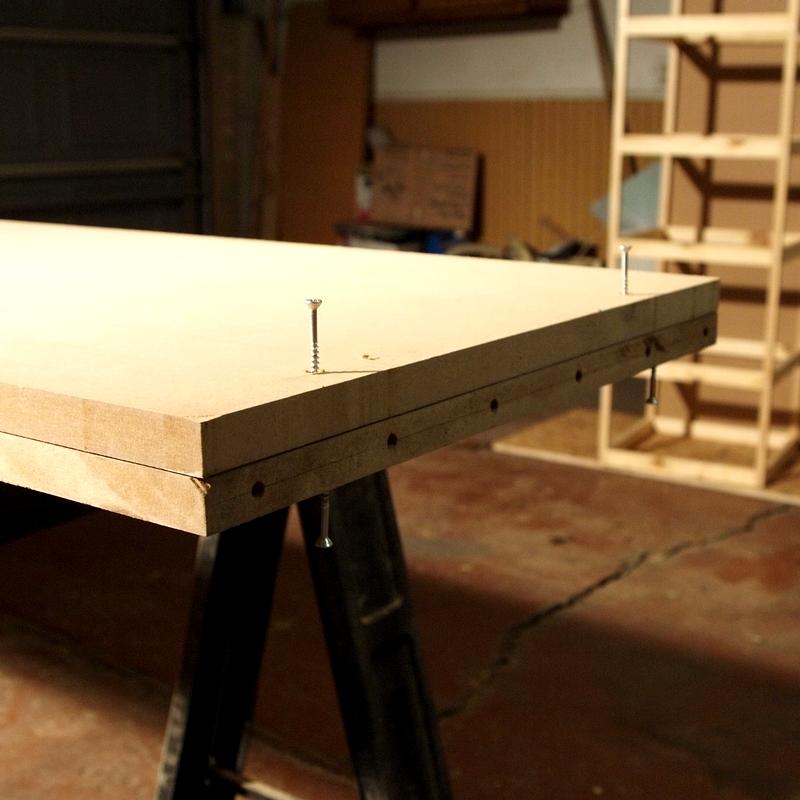
 If you want to be able to use your measuring tape to line up the screws exactly with where you will be drilling into the frame -- and that's wise, because it's a narrow target -- it makes sense to put down a couple of screws to temporarily secure the panel to the box. I ended up using eight screws in total, one a few inches in from every edge as pictured. So, pick a couple good spots at opposite corners and screw it down with two for now.
- Now you can use your router and follower bit to square everything up. The temporary screw holes will keep the panel aligned when you go to reinstall it with glue.
- While you're up there, mark off and circle the remaining screw holes using your measuring tape and some good judgement. Put a match mark on one side of the box and the same edge of the cap, so you can put it back on the right way. Then you can pull the panel.

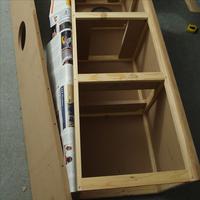
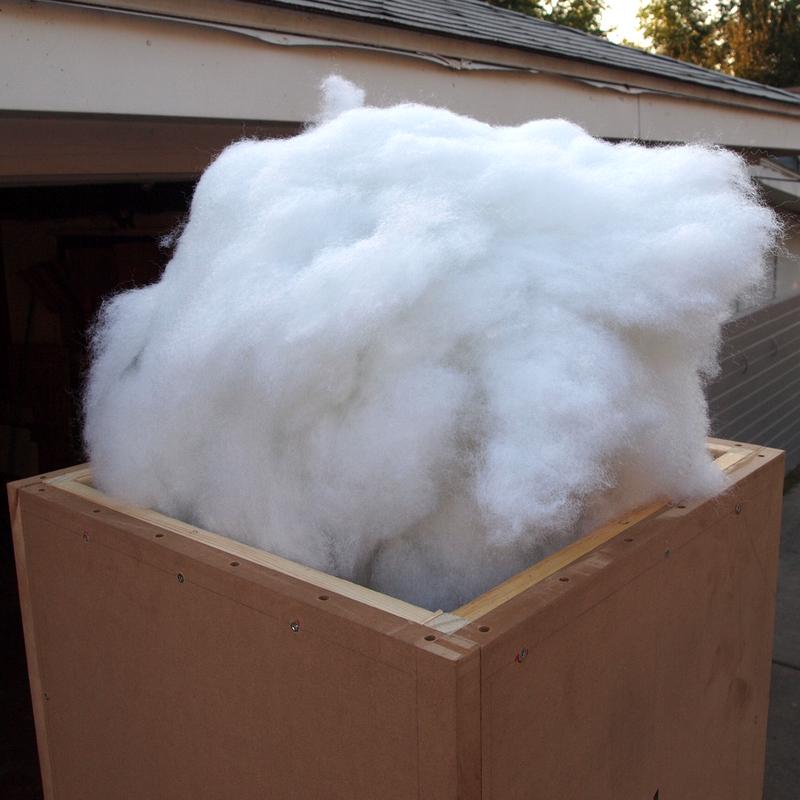
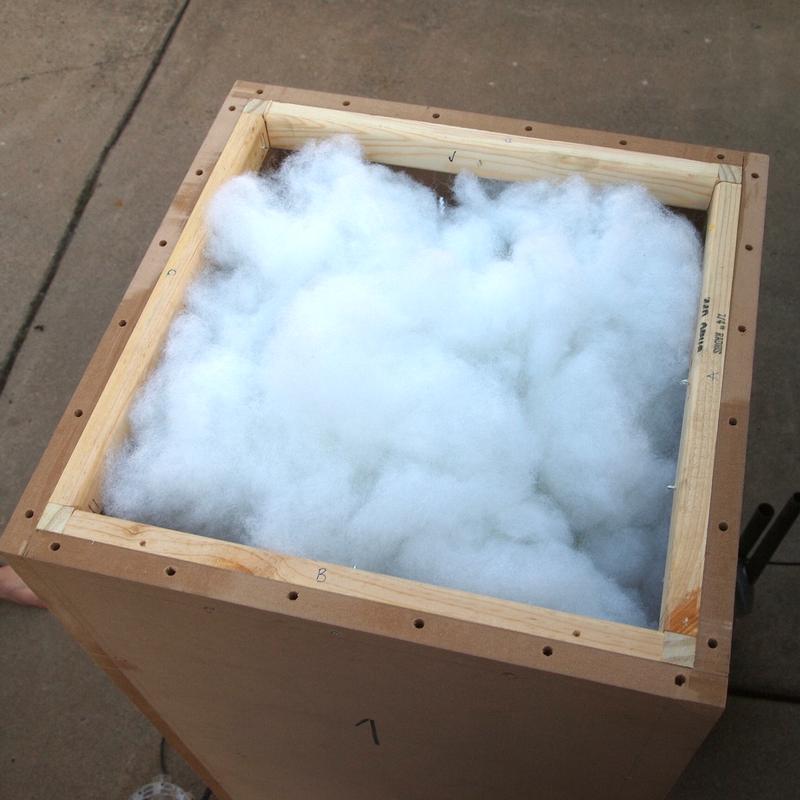
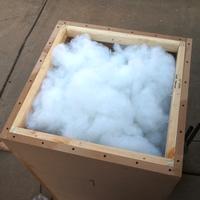 The general rule of thumb when building speaker cabinets is to put the damping material in last, but it's simply not practical when your arms would need to be twice as long to do that. Instead, stuff the top half of the cabinet while it's still open. With this cabinet, you're looking to put about three big bags worth of poly-fil (six pounds) in the top half, so get stuffin'. You can do the first two from the top, and the third one from the woofer holes. Make sure it's stuffed about as evenly as you can, round corners and into nooks and crannies, and force it all down into place, It's good if some hangs down into the area behind the woofers, but make the top as level and low as you can so that you're not fighting it to put the top cap on.
- I would strongly recommend getting a couple pieces of paper and taping up the area where the damping material is sticking out between the braces inside the cabinet just above the woofer cutouts, to help keep it from getting too dirty as you progress later on. While sawdust isn't the end of the world, I'm sure it's still a little abrasive, and this is right where your drivers are going to be.
- Line both the exposed edge of the frame and the top edge of the MDF sheets with a thick bead of glue, just as you did when putting on the side panels.
- Working quickly as before, get the panel into place and screw it down with the first two predrilled screws. Then drive in the remaining screws; I'm not sure it matters, but I used a star pattern, like putting on a car tire, since that tends to reduce internal stresses. Make sure to wipe the excess glue off, and make a couple passes to make sure you've got the screws countersunk a little bit.
- Remember to sand off the excess MDF kicked up by the countersinking.
- With a helper, get the box turned upside-down. This will use gravity along with your screws to help hold the glue in place for the most important part of its setting time.
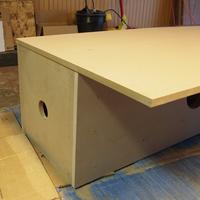
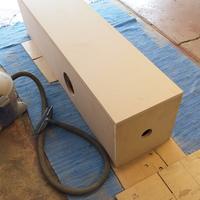
- Now you can repeat steps 2 through 6, 10, and 11 with the bottom cap. There are only two major differences: you don't need to stuff this end before it's put together, but you do need to drill out a hole for the speaker terminals.
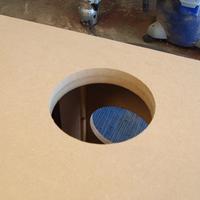
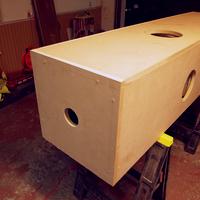 The hole is simple and circular. All you need to do is mark a spot in the middle (just draw diagonals from corner to corner, they'll intersect at the center) and drill it out with your trusty hole saw. As you have no doubt noticed by now, MDF is extremely dusty, and it tends to clog up the saw; what you need to do is lean into it a little bit, then draw the blades back out of the wood with the drill still spinning to fling off the accumulated dust. In and out, in and out, just like your favorite activity, until you're through.
[Editor's note: I have found a hole saw called the "Big Hawg", by Milwaukee, that fits common arbors and goes through MDF like a knife through butter. I highly recommend the expenditure - the same 3" saw can be used for the terminal holes and the tweeter holes.]
- Now you can glue and screw this panel just as you did with the top cap.
- Invert the box again to let that side dry with the help of gravity, and get to work doing all this to the other cabinet.


Well! Other than all the box moving, that should have been relatively simple. If for some reason you've been playing muscle man by yourself to do all this work so far, I sure hope you enjoyed it, because you're about to make the cabinets absurdly heavy. It's okay if this layer isn't perfect; mine certainly wasn't, but there's ample opportunity to redeem your skills in the rest of this Phase.
* When broken in. Not applicable in all areas. Your mileage may vary. Also not quite as good as they ever will; some damping on the outside of the cabinets will surely cut down on interactions with nearby walls.
Framework - Inner panels - Woofer holes - Bracing - Assembly
End caps - Outer panels - Odds and ends - End caps redux - Paint
Trim - Grills - A Year With the HUMAN 1000 - Epilogue
Starting - Tools - Materials
First cuts - Frames - Inner panels
Woofer holes - Bracing
Assembly - End caps - Outer panels
Odds and ends - End caps redux
Paint - Trim - Grills
A Year With the HUMAN 1000
Epilogue
Outer panels
You probably remember how the end caps just now were fairly easy, whereas the big panels you first had to put on were kind of a stone bitch. The outer panels are somewhere in between. In this section you'll be rough cutting, trimming, beholing, gluing, and sealing the large outer panels, bringing you ever so close to structural completion.
Note that there's a couple different ways to do this outer layer. It could be an exact duplicate of the inner layer writ 1.5" larger, with one overlapping board per face. Or if you're bad at math, you could tell the orange-vested wage slave at the Friendly Local Home Improvement Store an entirely incorrect measurement and end up with two boards too narrow to do that. In that case you'll be right along with me: two opposite faces will be the exact width of the inner layer, and the other two faces will have the extra width on them to make up for it. Both options are fine in the end, but you'll need one additional tool (a 1-1/2" following router bit) to do it my way.
In my case the narrow side panels were 73.5" x 17.5", and the wide side panels were 73.5" x 19", in case you're curious.
 For this bit you'll want the box to be on its side, preferably on the floor. I laid out an old cloth rug on the garage floor to keep the box from getting dinged up. Oh, and also to keep you from getting all grimy from laying on the floor.
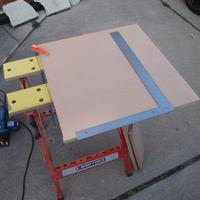
- What you'll want to do is take one of your uncut wood panels and lay it on the box, lining up one long side and one short side. Leave just a little bit of overhang so you'll have something to rout off, and lay down and mark a nice long line across where you'll be cutting, just like you did in the previous section.
 Move the panel over to your trusty saw table and sawhorses, and use your long straightedge to make a nice straight(ish) cut. As always, being a bit over is a lot better than being a bit under; we'll be using the router to straighten everything out later anyhow.
- Now return the trimmed panel to the box; line it up so there's just a little bit of overhang on every single side. Screw it into place with one screw near each end.
 You'll need to use the long 1-1/2" following bit on your router in order to get down to the side panel on one edge -- you don't want to be making a copy of a copy. Go steady and slow all the way around, and be careful as you rout around the corners; the longer bit is a lot jumpier and more vibration prone, and this is an important part.
 While the panel is still secure, now is a good time to open up the woofer hole. If you have a drill or spade bit big enough to get the router's following bit through, go for it. If not, well, you have a hole saw. Just be careful that you're undercutting, not overcutting, or you will be in real trouble. Then just use the following bit (the shorter one; you'll have a better time with it) to rout out the hole.
- Though I didn't get to this until later when I was making mine, it's also an excellent time to mark out where your screws are going to go. Your strategy this time is going to be a bit different; you have to avoid screws that are already placed, and you also want to make sure that the panels are most firmly attached exactly where the inner layer would be likely to vibrate, in the space between the 'rungs' of the inner frame. Placement doesn't need to be exact; just figure out a whole bunch of spots where you can drive into, spaced as irregularly as you please, and circle them in red. I did about 18 screws per side, including one or two near the middle of the widest-spaced reinforcements, and fairly close in around the woofer holes.
 Now it's time to place the tweeter. My square has a 1.5" wide short side, and a 2" wide long side. Align the long side with the side of the box, and then scoot the short side up right til it's just touching the very top of the woofer hole. Make sure you're still square against the side, and then draw a nice long pencil line. Then, figure out exactly where the top of the circle is touching, and make a mark there on that line you just drew.
 With that line and dot, you can move the square over and put another mark 2" in; this will be the center of your tweeter hole. In the picture I pulled the square back a bit so you can see the marks. Now that you have your mark, you can go ahead and pull the panel and set it across your sawhorses again.
- Saw out the tweeter hole with your hole saw, using that mark you just made. In and out, in and out. I'm sure you remember, right? We only need to make the hole on the outer layer because the tweeter (when surface mounted, not rabbetted) won't extend past the outer layer. This means you get to leave more wood there and improve the box's rigidity a bit.
 This is a good time to check and make sure your holes are actually the right size. Just drop the drivers in and make sure they sit evenly all the way around. You can also check to make sure that the back of the tweeter is fully contained inside the board.
 Because we're mating a panel with a panel instead of a panel with some sticks, there's going to be a whole lot more glue involved. I don't know how much glue is best, and the internets weren't very helpful on the subject; I just drew a big outline and then did a bunch of horizontal lines a few inches apart. Also, circles around the tweeter and woofer cutouts (though you will have to make a guess about the exact location of the tweeters, obviously. (This photo is slightly incorrect in that it shows caulk; you'll be using that on the long sides, but just glue for this one.)
- Set it down, square it up, and screw screw screw. Make sure to wipe off excess glue around the outsides and the driver holes as you go, and countersink all the screws. You don't have to worry so much about stripping these since you're driving into a fairly sturdy surface; one pass at a medium torque setting is plenty.
- Roll the box onto that freshly-glued side (more using gravity to help clamp the glue) when you're done. Repeat the whole process for the side now facing up.
- The wide sides are similar, but with two major differences: first, you can use the much better-behaved 1" following bit for everything. And second, you need to begin to seal the cabinet. [Editor's note: I would have done this - or tried to - when assembling the inner panels to the frame, I think.]
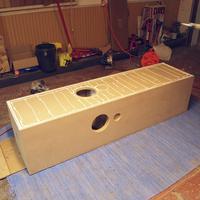 Since it's difficult if not impossible to caulk this cabinet from the inside, you have to settle for doing so somewhere in the middle. I used standard white vinyl caulk, and put down a nice thick bead down the seam of each short side, along with one down the seam of each end cap, completely outlining the surface. Past that, the gluin' and screwin' process is exactly the same. The caulk sets more slowly, so I would put that down first.
- Rinse and repeat for the remaining side, and do the same with your other cabinet. Once it's all done you can set them on their feet and sand down all those screw holes.

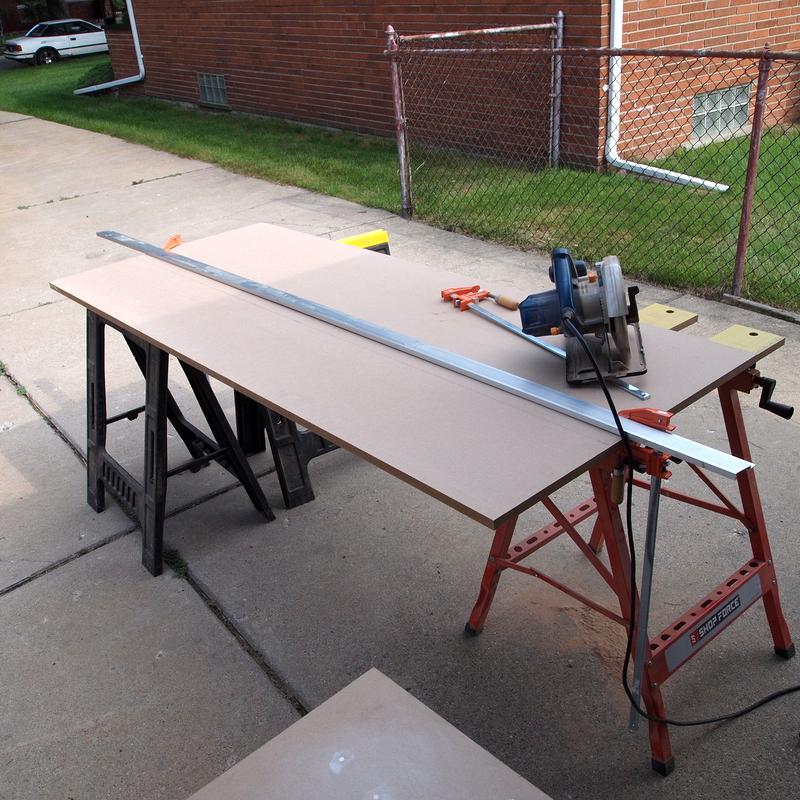
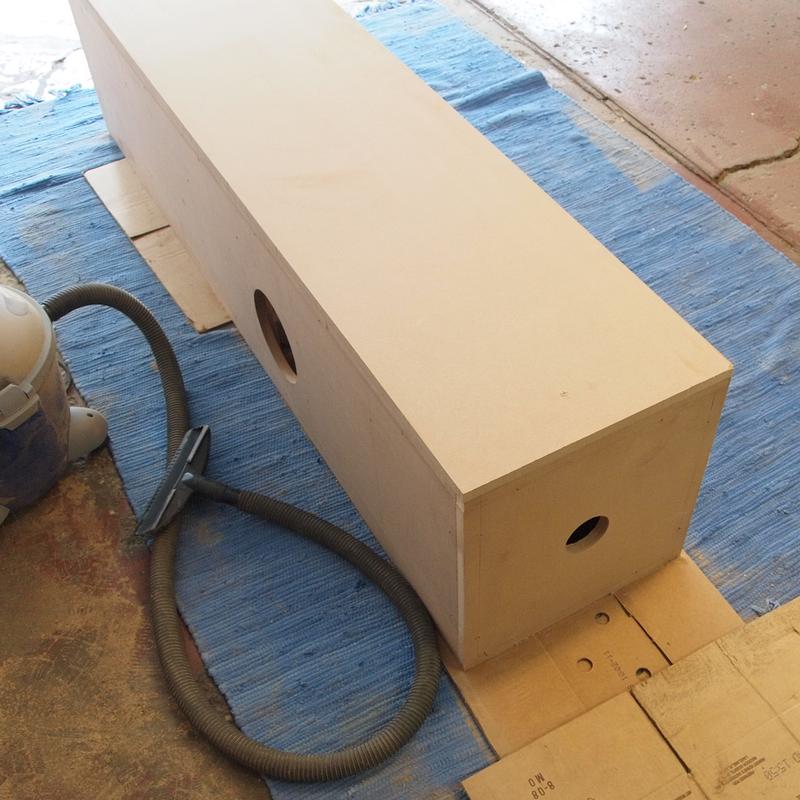


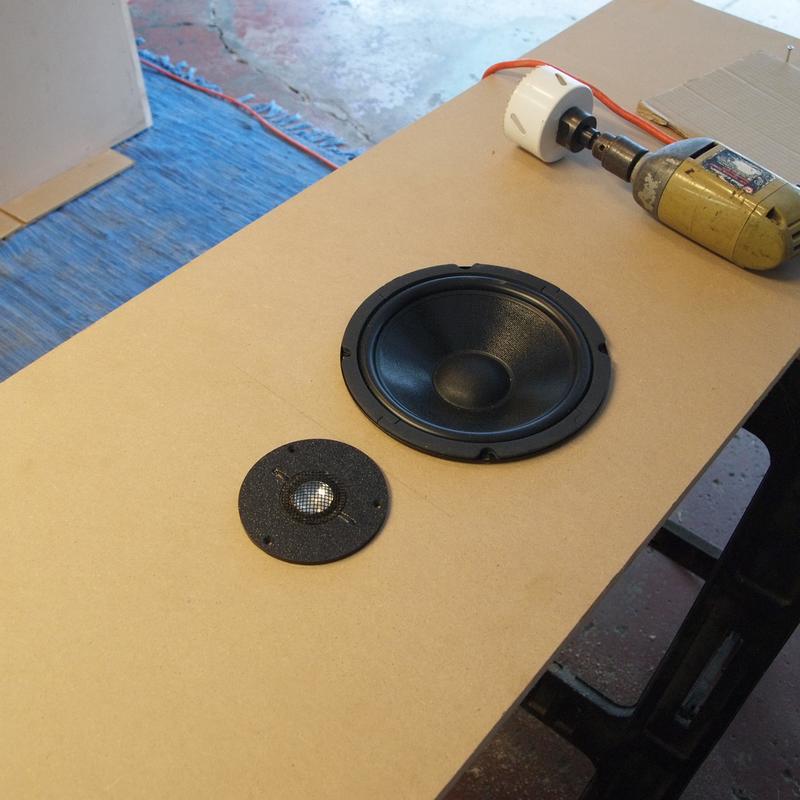
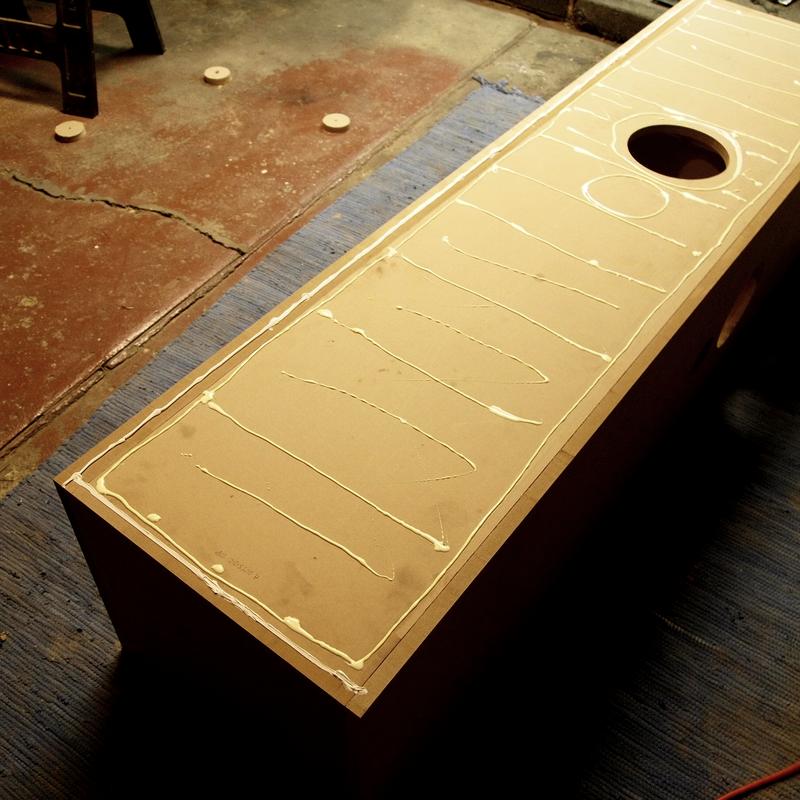

You've probably noticed the cabinets getting heavier and heavier as you go. Twice as heavy, one might say. But this is a good thing, because when the cabinet is this dense and this sturdy, it's not going to be doing much speaking of its own. The next step will be just a little bit of prep for the drivers, a nice breather before the endcaps go on and you can test it for the first time.
Framework - Inner panels - Woofer holes - Bracing - Assembly
End caps - Outer panels - Odds and ends - End caps redux - Paint
Trim - Grills - A Year With the HUMAN 1000 - Epilogue
Starting - Tools - Materials
First cuts - Frames - Inner panels
Woofer holes - Bracing
Assembly - End caps - Outer panels
Odds and ends - End caps redux
Paint - Trim - Grills
A Year With the HUMAN 1000
Epilogue
Odds and ends
This bit is quick and easy. Odds and ends, really, making sure everything fits and preparing the drivers for installation.
- The tweeter cutouts need two holes, 1/4" is fine, drilled at the left and right sides to let the wires through. You'll want to get the holes just as close as you can to being at the widest point in the circle, as that's where the connections are on the tweeters.
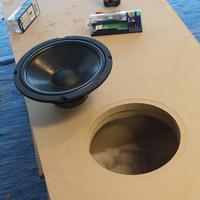 Using the 1/2" rabbeting bit and your router, you can set it just a tiny smidge below level and make a test run around one of the woofer holes to make sure it looks right. Once it looks good, you can drop the bit down further -- 5/32" is the official measure, but I just experimented until it looked good and locked the router there -- and do a proper job, slow and careful, all the way 'round. Drop the woofer in place and make sure it sits evenly with no high spots. I found that while the inner diameter fit perfectly in the last section, it wasn't quite right when it was rabbeted, and I had to sand it all out with a Dremel. Looks fine, but it was more work than I preferred.
- Once you've got that done on all eight sides, you can make some pilot holes for the drivers and the terminal cup. Just put in a driver one at a time, lined up how you'd like it, and mark all the holes off with a pencil. Afterward go around and drill 1/16" holes for everything, bearing in mind the lengths of screws you're going to use.
[Editor's note: a customer sent me a set of "Vix bits" which are incredibly good for drilling nice, centered pilot holes.]
 Remember all those screws you countersunk and all those holes you sanded? This can be done any time before you paint, but now's as good a time as any. With some spackle and a putty knife, cover up all those holes. Sand it as flat as you possibly can, and it's not a bad idea to add another coat just to make sure you've got the screw holes leveled out as well as you can.
- Remove that paper that you taped up inside; you're done with all the woodwork for the driver area now.


Short interlude, yes? But it'll make everything else a little bit faster. Your next step is structural completion.
Framework - Inner panels - Woofer holes - Bracing - Assembly
End caps - Outer panels - Odds and ends - End caps redux - Paint
Trim - Grills - A Year With the HUMAN 1000 - Epilogue
Starting - Tools - Materials
First cuts - Frames - Inner panels
Woofer holes - Bracing
Assembly - End caps - Outer panels
Odds and ends - End caps redux
Paint - Trim - Grills
A Year With the HUMAN 1000
Epilogue
End caps redux
Well, this is it. The fabled End of Phase Two, wherein you become as finished as you have to be. Spray paint it and put it in the living room. But first you'll want to finish the outer endcaps, which will provide the last of the structure, a way to get your wires to the terminals, and the final airtight seals.
- I'm going to cheat a little bit because you've already done most of this. Rough cut, temporarily secure, and rout the top caps, and then caulk the seams and glue and screw in much the same way as you did for the large outer panels. I used five screws for the top; four corners (in far enough to go into the inner end caps), and one in the middle. Go ahead and turn the cabinets upside down after you're finished.
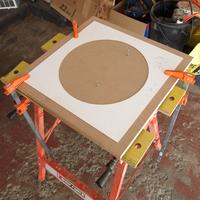 Rough cut and rout the bottom caps in the same way. The difference is that this time, when you're finished, you're going to be using the 8" woofer hole jig to rout a big hole in the middle. Getting close to center is as good as perfect, since this is going to spend the rest of its life pointed at the floor.
 Then, use your roundover bit to make a nice curved and nonabrasive edge, both to make it pretty and to keep your wires from snagging or getting cut up.
[Editor's note: you could also rout a groove from this large opening to one side edge to serve as a wire conduit later.]
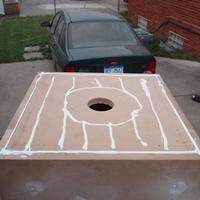 I used a glue and caulk pattern just like this, except without the big circle for the cutout, on the top. This secured quite nicely when it was all screwed into place.
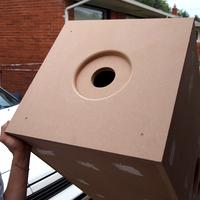 Secure it quite nicely by screwing it into place. Wipe off the excess glue and you're done!
- At this point you can screw in your terminal cup (I'd use a bit of caulk to secure it in place, along with the glue) and feed the wires up into the cabinet. Tape them off someplace secure.
- Using your remaining damping material, two bags or four pounds each, stuff the bottom halves of the cabinets through the woofer holes. The top has a little bit too much stuffed into it, so you can pull some of that down into the area just behind the woofers.
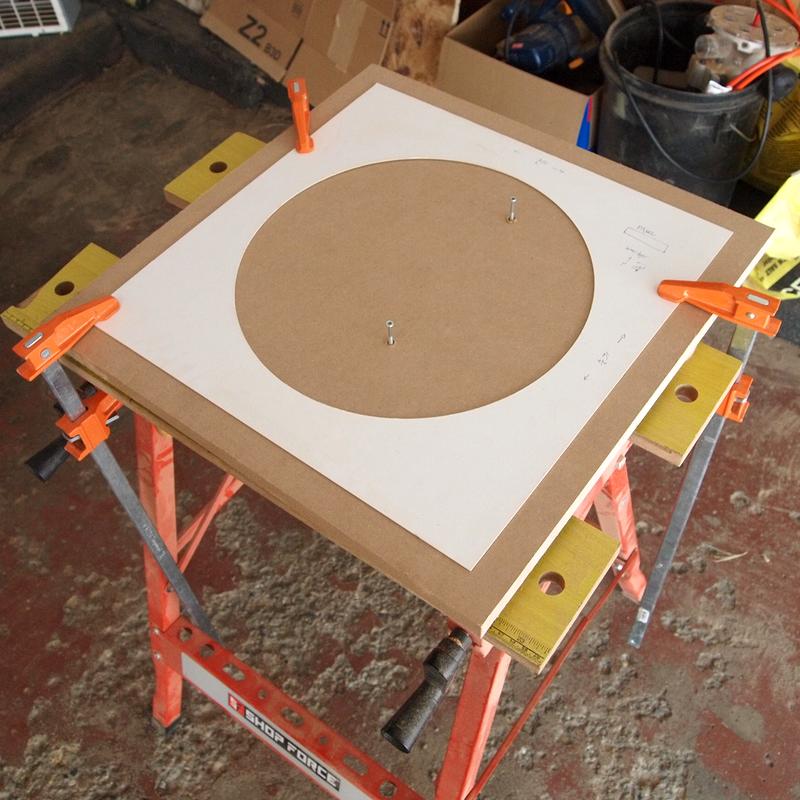
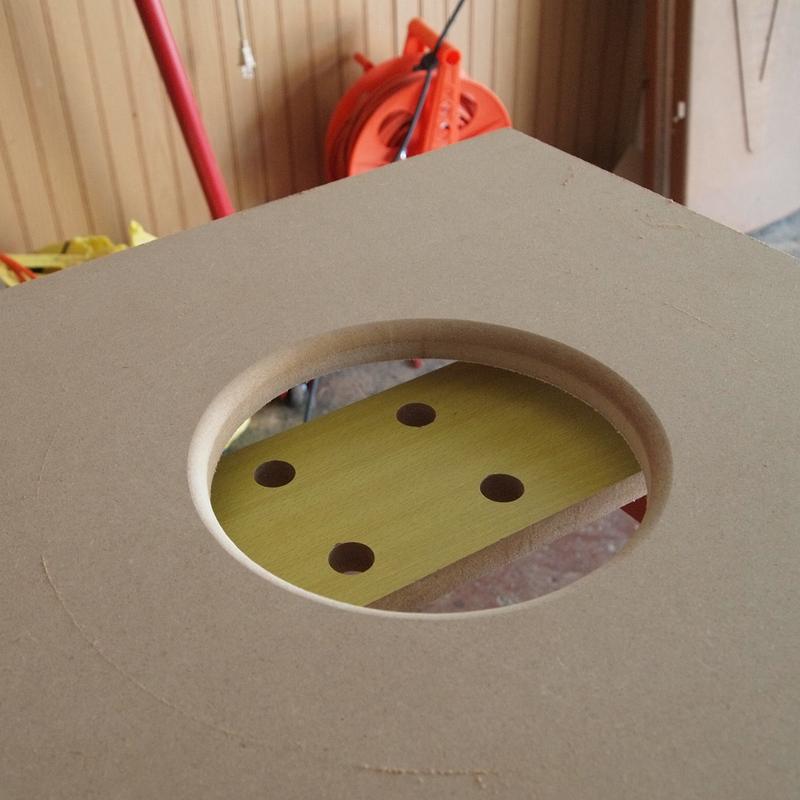
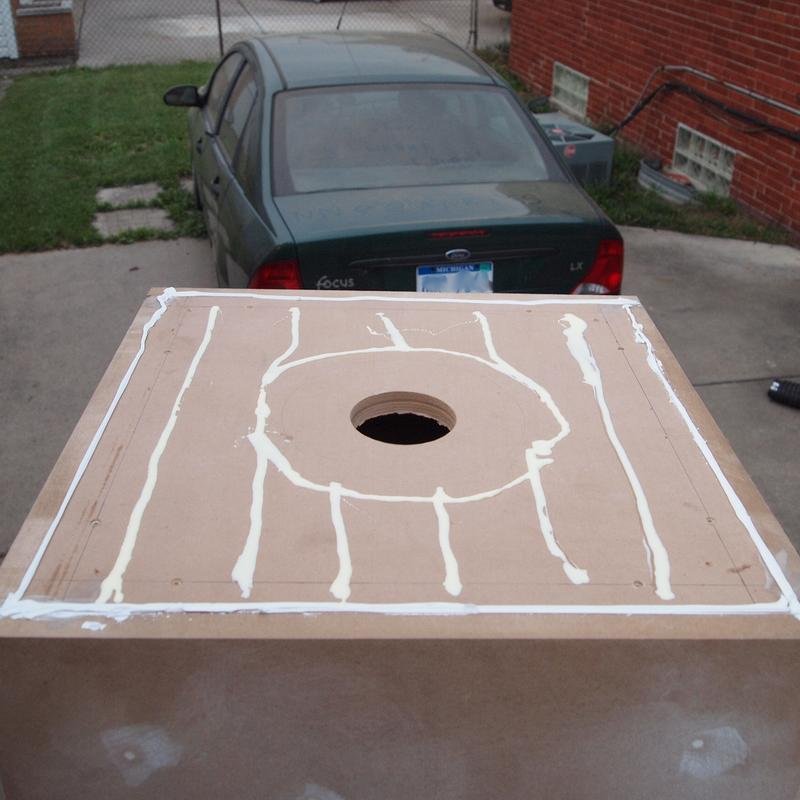

Although I haven't done this yet, it wouldn't be a bad idea to use your roundover bit to clean up some of those small wood circles you've cut out in the past (to make the tweeter holes), and screw them to the outer corners of the bottom panel as feet. It'll give your cabinets a somewhat more secure footing, a modicum of protection against spills, and provide a proper space to run wires to the terminals.
[Editor's note: you could even open up the center holes in these to accept threaded inserts, to you can use fancy levelling/coupling spikes later. Or just install threaded inserts into the bottom end caps without the circles.]
So here you are, at the end of Phase Two. I'm sure it was a lot faster to get through this part than the first part; not so much measuring, not so much guessing and headscratching. The cabinets are nearly as large and heavy as they're going to get, and the remaining work is just to make them pretty.
Framework - Inner panels - Woofer holes - Bracing - Assembly
End caps - Outer panels - Odds and ends - End caps redux - Paint
Trim - Grills - A Year With the HUMAN 1000 - Epilogue
Starting - Tools - Materials
First cuts - Frames - Inner panels
Woofer holes - Bracing
Assembly - End caps - Outer panels
Odds and ends - End caps redux
Paint - Trim - Grills
A Year With the HUMAN 1000
Epilogue
Paint
My technique was to mask off the places I was sure I'd be putting down trim, which in this case is along the edges of all the faces. This provides a vague concept of what the trim will look like, if you're using a contrasting paint color like black. And then - paint, paint, paint. MDF soaks in paint as it does all liquids, so I did several coats. In the end it looks okay enough from a distance that I'm satisfied, especially considering it'll be covered with grills anyway.
- Painting is mostly tedium. Your first step is to tape every single edge on the long faces of the cabinet with 1" to 1.5" wide masking tape. You want to outline every face. Don't worry about masking off the top or the bottom, but make sure you're putting the tape down in a pretty straight line, using the edge of the box as your guide.
- While you're at it, run your fingers over that spackle and make sure it's smooth and even. It'll show up -- slightly, but noticably -- if you didn't do it just so. Then at the very least, dust off all the surfaces. The shop vac will take most of the clingy sawdust off the surface, and then you can use a nearly-dry moist rag to wipe things down the rest of the way. Just make sure the surface is dry before you start painting, and don't soak it in the slightest.
[Editor's note: this is where a "tack rag" can come in handy. This is a rag that is just slightly "moistened" with varnish (polyurethane), and it will really pull up any leftover dust.]
- Get all your painting stuff together, mainly your roller and handle, stirring stick and tray. Mix up the paint and pour a bit in the tray, and get to work. Just like painting a wall, you'll want to use even, steady strokes, not so fast as to spatter yourself with paint, working in squares in an N pattern. Pay attention to any lines you may be leaving and gently roll those out.
- When you're done around all eight sides with the first coat, you can go back with your smaller brush and hit the insides of the rabbeting with a light coat (not too much, especially if your clearances were already tight to begin with.)
[Editor's note: Ian is right about those tolerances - I've done this, and using a 3" hole saw followed by a 1/2" rabbeting bit leaves a place that exactly fits my 4" diameter tweeter. So I had to carefully remove most of the paint in order to fit the tweeters later. The woofer dimensions are slightly more forgiving, and also, of course, it is easier to muscle them in as you tighten the screws.]
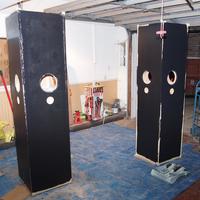 It's probably going to look kind of crappy after the first coat, because the MDF is going to wick it all up. The second coat will look much better. Just give it a couple hours to dry -- or whatever the paint can says -- and recoat in the same way, skipping the rabbetting this time.
[Editor's note: yes, more of my yap. In my experience building my 250+ project, even the first coat looked just fine. I used two coats anyway. The roller also leaves a nice slightly stippled finish. (I used a foam roller that worked very well.) I should add that those boxes were built such that all screws were internal, so there were no spackled or sanded surfaces to contend with on the outside.]
I ended up doing three coats in all, and it looks pretty good. After the second coat, if you'd like to reduce the bumpiness of the finish, you can sand it down a little bit with a nice gentle swirling pattern with the sandpaper, preferably a finer grit if you have it.
It was my intent to simply spray the tops and bottoms, but I didn't quite get around to it. Out of sight, out of mind, yes? The bottom could stand something waterproof like bedliner, but you would want to make sure that no painted parts are touching the floor, or else you'll ruin your carpet even more than simply crushing it with absurdly heavy cabinets.
[Editor's note: I'd do the first coat with them upside down, and using a stepladder or chair, paint the bottom. Then, being sure not to let that coat "stick" to the dropcloth or floor, I'd do the later coats with them upright and do the tops at the same time.]
- Let it dry for a night or two, and you can take the masking tape off. You need to be extremely careful, because the paint will want to come up with the tape; just go slow, hold the tape close and pull it straight down or at a slight outward angle, and keep a knife handy to carefully cut any paint that might start to come up. In the end by being careful there aren't any noticable defects on the edges of the paint, but I did have a couple of close calls. I was not as vigilant as I should have been with the spackle. But that's what grills are for.

This is where the guide comes to a close for now. The temporary epilogue is as follows: I got the paint on, pressed a friend into helping me get into their temporary winter home, hooked them up, and started blasting. I mean breaking them in gently. No, I mean blasting. After a week or so they went from sounding good to sounding great.
Framework - Inner panels - Woofer holes - Bracing - Assembly
End caps - Outer panels - Odds and ends - End caps redux - Paint
Trim - Grills - A Year With the HUMAN 1000 - Epilogue
Starting - Tools - Materials
First cuts - Frames - Inner panels
Woofer holes - Bracing
Assembly - End caps - Outer panels
Odds and ends - End caps redux
Paint - Trim - Grills
A Year With the HUMAN 1000
Epilogue
Trim and stain
 [Editor's note: around this time, Ian started to suffer either from writer's block, or, more likely, sheer laziness. All he has left us with regarding the "make them pretty" steps is this photo with the unfinished trim installed, and the following rambling note.]
Eventually they're going to look like that, with either dark trim and light grills, or more likely light trim and dark grills, with sound-absorbing material worked into the sizable dead panels to reduce acoustic interaction between the cabinets and the walls.
This is past the last section I was actually able to complete before winter struck and I had to move everything inside. So the actual truly finished product will have to wait until spring. Of course, you could take advantage of this intermission to come up with some fabulous ideas about how to finish them by yourself, too.
Framework - Inner panels - Woofer holes - Bracing - Assembly
End caps - Outer panels - Odds and ends - End caps redux - Paint
Trim - Grills - A Year With the HUMAN 1000 - Epilogue
Starting - Tools - Materials
First cuts - Frames - Inner panels
Woofer holes - Bracing
Assembly - End caps - Outer panels
Odds and ends - End caps redux
Paint - Trim - Grills
A Year With the HUMAN 1000
Epilogue
Grills
[Editor's note: Ian never made grills for them. We hobbyists never do. It's a lot of work for no gain, since they already work as speakers, and most hifi fetishists prefer to listen with them off anyway. And look at them with them off. But here is a photograph someone passed along of their final appearance.]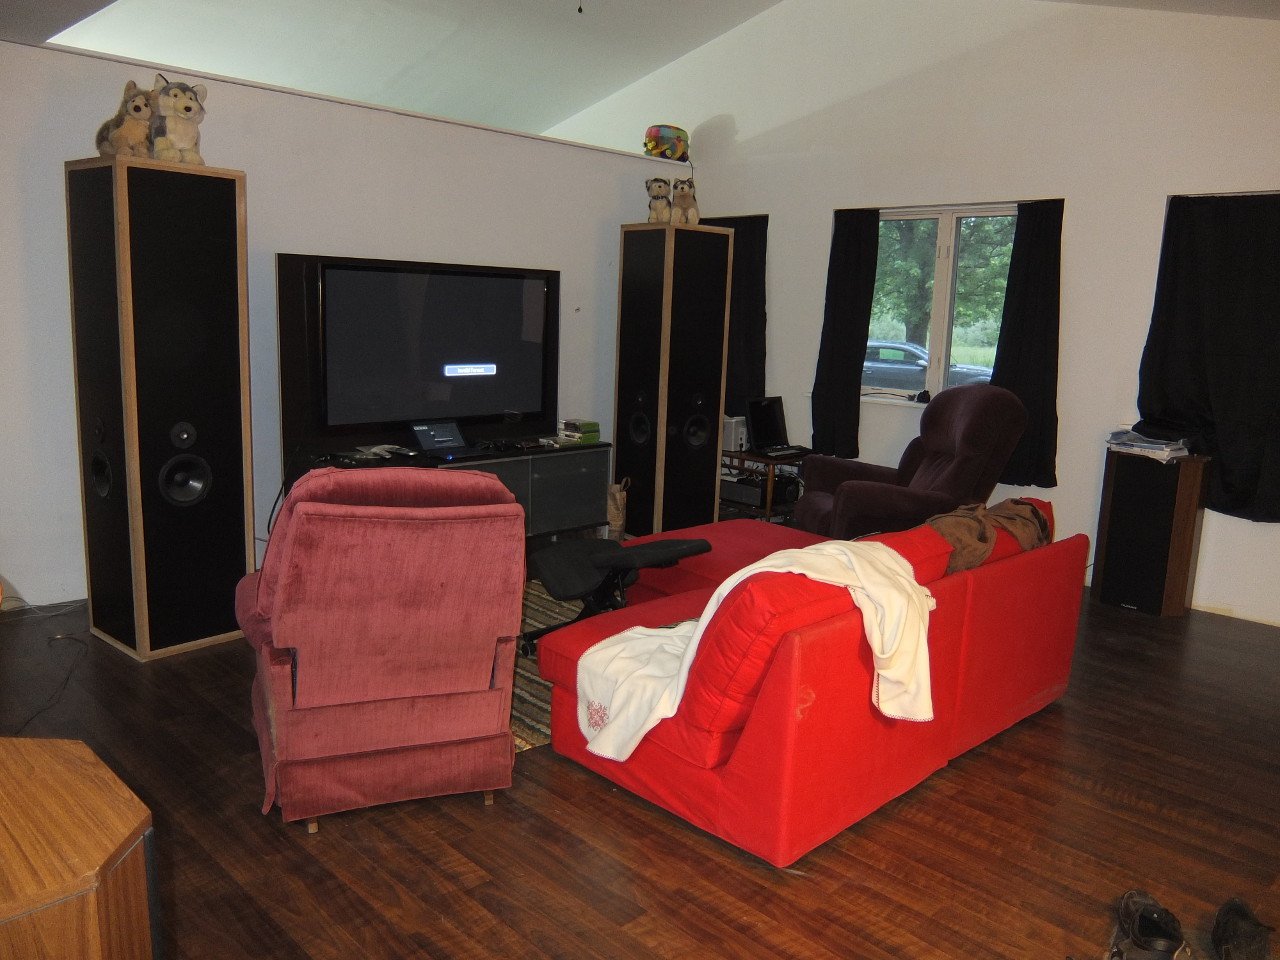
Framework - Inner panels - Woofer holes - Bracing - Assembly
End caps - Outer panels - Odds and ends - End caps redux - Paint
Trim - Grills - A Year With the HUMAN 1000 - Epilogue
Starting - Tools - Materials
First cuts - Frames - Inner panels
Woofer holes - Bracing
Assembly - End caps - Outer panels
Odds and ends - End caps redux
Paint - Trim - Grills
A Year With the HUMAN 1000
Epilogue
A Year With the HUMAN 1000
A year ago I finished my Human 1000 kit to the point of painting them and taking them inside. They're still not cosmetically finished, waiting for their permanent home before I spruce them up and make them utterly presentable. But it's been long enough to have some relatively objective thoughts about the project, and its results.
So. Well, they're huge. Huge and heavy. With five substantial internal braces and 1.5" thick walls, cabinet resonance doesn't seem to be a huge problem; you can touch virtually anywhere on the cabinets while they're playing at reasonable volumes and feel virtually no vibration. I really couldn't be happier with the overall solidity of the structure; by calculations they should be around 250 pounds apiece, which at over 60 pounds per woofer is more than enough mass, substantially better than the original EPI 1000's thinner, lighter walls with only three braces.
And how do they sound? Well, they sound great. Asterisk.
It is a "no compromises" design, the ultimate halo speaker from EPI. It has a great deal to recommend it; effectively limitless power handling, intense highs from that truly amazing Human concave dome tweeter, and the sort of smooth, bottomless bass that can only come from having so much per-woofer volume. What's more, unlike a vented design that has to be turned up a fair bit to "breathe" and really get into the low end, these can be playing at the lowest of volumes and still play those lowest of notes. They can, in short, whisper thunder.
And they can shout it from the rooftops. Kissing the limits of my 95 (true) watts/channel amplifier, it's nearly impossible to be in the same room with them, and yet the woofers are barely breathing as they pound relentlessly through the entire house. If they were driven to their true limits of around 800W/channel, I can only imagine I'd be replacing windows in short order. At anything approaching normal listening volumes, the drivers are simply never working hard enough to sound like they're working hard.
But how do they sound?
Well, the short answer is, they sound pretty good. And this is the asterisk part. It's not really a no-compromises design. Having drivers on all four sides is an inherent compromise, and it manifests itself in several ways. First, they really want to be in a large room. In fact, I'd say they want to be in a room larger than any in this house; when I was testing them in the garage, cabinets a few feet away from the walls and plenty of air volume in the room, they sounded tight and accurate. Indoors, in a very small (120 square feet) room, the midrange is muddied substantially by interaction with the walls. What's more, since you have inward and forward facing drivers, the speakers are much better at exciting both front-to-back and side-to-side room resonances, which makes them sound a lot more boomy than they should.
[Editor's note: of course, that tiny of a room would never be the final home of a pair of speakers this large.]
That said, I'm almost certain that is simply a "room thing" and not a "speaker thing". In a large room, perhaps with a cathedral ceiling (into which any normal sized speaker's output would be forever lost), they would perform vastly better. I am also convinced that with a properly finished exterior, with some sound-damping foam behind all the non-functional parts of the grills, [Editor's note: what grills?] they'd sound better even in a smaller room by soaking up some of their own wall interactions. When I actually get to that, I'll have to report on how the sound changes.
Even with damping material on their faces, they are never going to sound quite like a traditional speaker. Omnidirectional designs like these, and others from other hi-fi makes from this era such as Sonab and JBL, served two purposes. The first and primary one was to mask the often awful stereo mixes going around at the time -- by expanding (or perhaps muddying) the soundstage a bit, omni speakers made bad mixes sound better. But the inescapable compromise is that pinpoint accuracy is impossible; you will never get your brain to truly believe "this box is in that corner" like you can with a unidirectional speaker. Whether this is a good or a bad thing, I suppose, depends on your setup and the programs you prefer. At any rate, the weaker imaging does promote a feeling of "being there", as the sound is thrown richly about the room.
Looking back, I think it was a worthy project to build. It gave me some confidence and some skill in woodworking, however slight. It's given me reason to listen to much of my music all over again and hear all the bass punch and the various low notes and undertones that were nearly totally lost to my otherwise very good Genesis 2-like speakers that came before. Anyone who walks in immediately stops short on seeing them and says, "Whoa." And at $1500-$2000 to build, there's probably no better value for a system of this sheer capability. There is certainly no larger cabinet which could reliably fit through an average household door!
In sum, the major cons are: pickiness about room placement and room size, more likely to excite room resonances (which just get more obvious the louder it goes, muddying midbass particularly), and rather vague imaging. Whether that last con is a bug or a feature depends on the lens you look through; I tend to view it as the former, and have a feeling I might have been happier with all the drivers on the front face.
On balance I think the pros outweigh the cons. They're excellent conversation pieces, unabashedly ostentatious and with expansive sound to match. Building them was fun, playing them even more so. They go all the way down and all the way up, in stature, volume, and frequency response. The music to drive these didn't exist in 1973 when the design came out, and it's impressive they hold together as well as they do, albeit with a much upgraded internal structure compared to EPI's cabinets, and more modern, durable components.
I've listened to all manner of music on these by now. Most genres that I can think of, and there's a few that stand out in my mind.
So I think that about wraps it up. Go build some of your own, and tell us what you think. Or shake your fist at me regarding my bad directions!
Framework - Inner panels - Woofer holes - Bracing - Assembly
End caps - Outer panels - Odds and ends - End caps redux - Paint
Trim - Grills - A Year With the HUMAN 1000 - Epilogue
Starting - Tools - Materials
First cuts - Frames - Inner panels
Woofer holes - Bracing
Assembly - End caps - Outer panels
Odds and ends - End caps redux
Paint - Trim - Grills
A Year With the HUMAN 1000
Epilogue
Epilogue
[Editor's note: "EPI-logue" - get it? My apologies. As I was beginning to work on transcribing this story to fit seamlessly into the site in early 2015, I ended up working with Ian for some long nights over some long weeks, vastly improving the general look and feel of the site and incidentally making it "mobile friendly", as I milked his CSS skills until he probably shuddered when encountering the word "human" in other contexts. But I also pressed him to write this "five or so years later" perspective. I insisted on the hilariously punny title for this section.]
It's been a few years since I wrote about my early experience of living with these speakers, and years since I paid for this whole endeavor, and I've since moved to a house that had room to properly set up the 1000s. So, one might wonder, how do they sound now?
The room resonances I was concerned with have pretty well disappeared now that the speakers are in a room much as I described -- cathedral ceilings, a large room in a house with an open floor plan. With the newfound space to breathe, they fill what should be an acoustically difficult dwelling with lots and lots of sound. Compared with a small pair of bookshelf speakers I recently put together, their directional vagueness is well offset by sheer output and bass extension.
The reservations I had about the design were well-founded, but in a suitably sized room, I don't imagine you could do much better. I noted before that they were particularly good for live performances, and I'd say now they're even better for them. It's really something to be able to hear the 64 foot pipes in organ music and the near subsonic rumbles that roll through movies, while not having to suffer any trade-offs in the rest of the range for the most part. (Mids do seem to get chewed on a little in the crosstalk still.)
And they're still great conversation pieces, when discussing the art with new acquaintances. "Subwoofers", you say? "No, no. I don't believe in those."
Since I built them, there are now reasonably priced Class D amplifiers that will drive them in the range of $350. Ultimately I'd like to go that route both for power efficiency and volume, if only to hear them once at concert volume. I'd also like to finish them with dark stained edges and light colored grills. Perhaps in the spring (any spring will do), when I'm feeling more plucky.
So you have a big living room and some time on your hands? For this price, 10/10 would recommend.
ian
* * *
Top - Contact
New Speakers -
EPI and Epicure - Genesis Physics
© Copyright - All Rights Reserved
![]()
7 Kelsey Road, Lee, New Hampshire 03861
Prices can change and specifications will improve without notice